前言
阅读本文前请先阅读
[JS与链表]普通链表_AI3D_WebEngineer的博客-CSDN博客
ES6的Class继承
类的继承可以使用extends,让子类继承父类的属性和方法。
而在子类内部(构造函数constructor)必须调用super()实现继承(super()代表父类构造函数)
class A {constructor() {this.name ='abc'}} class B extends A {constructor() {super()}} // ----------------------------------------- var b = new B() // {name:'abc'}
class A {constructor(userName) {this.name = userName}} class B extends A {constructor(yourName) {super(yourName)}} // --------------------------------------------------- var b = new B('ddd') // {name:'ddd'}
双向链表
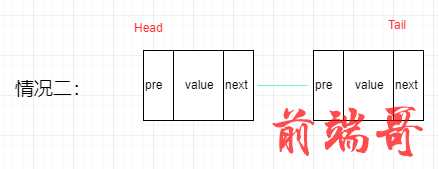
双向链表与普通链表的区别在于:普通链表的节点是链向下一个节点的(单向),双向链表的节点是链向上下两个节点的。

我们先从Node节点开始改造:
以下代码
class DoublyNode extends Node { #prev; constructor(ele,next,prev) { super(ele,next); this.prev = prev; } } class DoublyLinkedList extends LinkedList { constructor(equalFn=compareFn) { super(equalFn); this.tail = undefined } }
新的DoublyLinkedList类的构造函数里会初始化equalsFn、head、count和tail四个属性
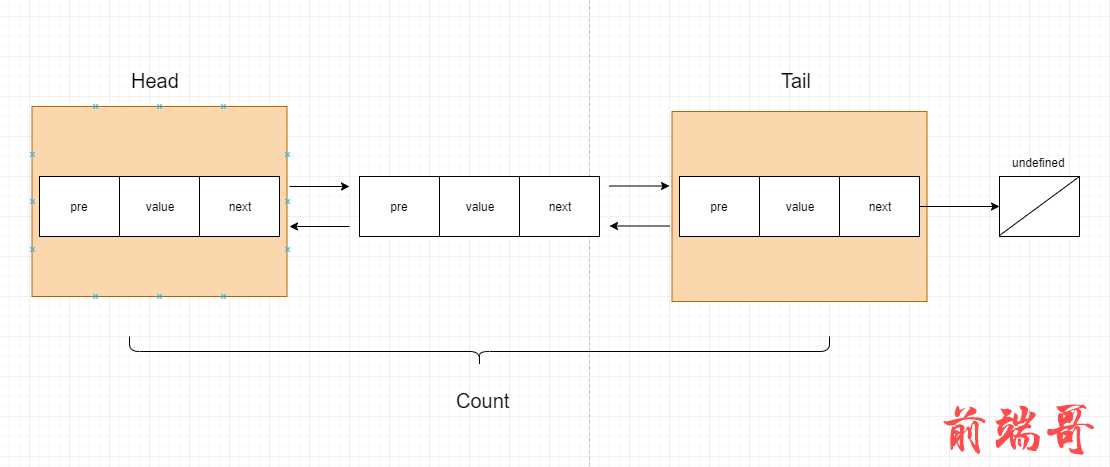
所谓双向链表就是可以由头到尾,也能由尾到头,甚至于在中间可以灵活转向(因为doublyNode节点有前后节点),而单向链表如果迭代时错过了要找的元素,则需要重新迭代。
通过下标获得链表节点
同链表的getNodeAt或者叫getElementAt方法(已继承)
getNodeAt(index) { if (index>0 && index >=this.count) {return undefined} if (this.index === 0) {return this.head} let currentNode = this.head; for (var i =0;i<index;i++) { currentNode = currentNode.next } return currentNode }
在任意位置插入新节点
比链表多了一种场景。就是尾部插入。
创建新节点:
const node = new DubblyNode(element);
从开头插入:
①空链表
this.head = node; this.tail = node;
②非空链表

var currentNode = this.head; node.next = currentNode; currentNode.prev = node; this.head = node
从尾巴插入:
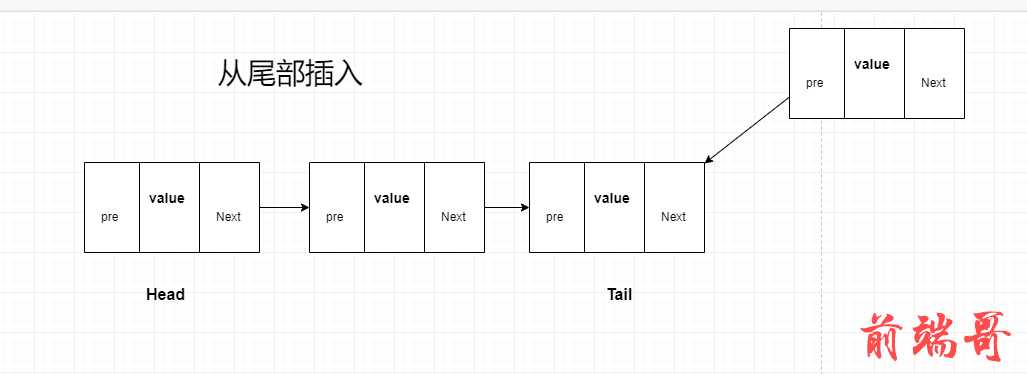
var currentNode = this.Tail; currentNode.next = node; node.pre = currentNode; this.tail = node;
在中间插入:
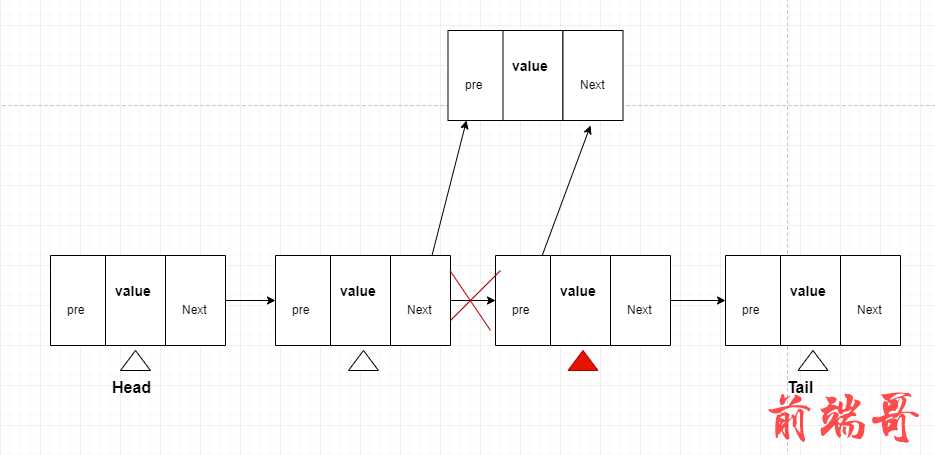
const originNode = this.getNodeAt(index); const preNode = this.getNodeAt(index - 1); node.next = originNode;; node.prev = preNode; originNode.prev = node; preNode.next = node;
整合:
insert(element,index) { if (index < 0 || index > this.count) {return false} const node = new DoublyNode(element); let current = this.head; // 开头插入 if (index === 0) { // 链表为空 if (this.head == null) { this.head = node; this.tail = node; }else { // 链表非空 node.next = currentNode; currentNode.prev = node; this.head = node } } if (index === this.count) { // 最后一项 currentNode = this.Tail; currentNode.next = node; node.pre = currentNode; this.tail = node; } // 在中间插入 const originNode = this.getNodeAt(index); const prevNode = this.getNodeAt(index - 1); node.next = originNode; node.prev = prevNode; originNode.prev = node; prevNode.next = node; // 结束 this.count ++; return true }
根据下标移除元素
需要判断三种场景:
①移除头部
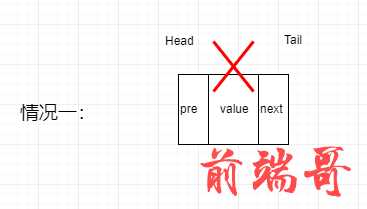
removeAt(index) { if (index < 0 || index > this.count || !this.count) {return undefined} let current = this.head; if (index === 0) { this.head = current.next; if (this.count === 1) { this.tail = undefined } } this.count --; return current.value }
... if (index === 0) { this.head = current.next; if (this.count === 1) { ... }else { this.head.prev = undefined } } ...
②移除尾部

... if (index === this.count - 1) { current = this.tail; this.tail= current.prev; this.tail.next = undefined; } ...
③正常移除
... else { current = this.getElementAt(index); const prevElement = current.prev; const nextElement = current.next; prevElement.next = nextElement; nextElement.prev = prevElement; } ...
整理一下:
removeAt(index) { if (index >= 0 && index < this.count) { let current = this.head; if (index === 0) { this.head = this.head.next; // if there is only one item, then we update tail as well //NEW if (this.count === 1) { // {2} this.tail = undefined; } else { this.head.prev = undefined; } } else if (index === this.count - 1) { // last item //NEW current = this.tail; this.tail = current.prev; this.tail.next = undefined; } else { current = this.getElementAt(index); const previous = current.prev; // link previous with current's next - skip it to remove previous.next = current.next; current.next.prev = previous; // NEW } this.count--; return current.element; } return undefined; }
循环链表
循环链表有单向循环链表和双向循环链表。
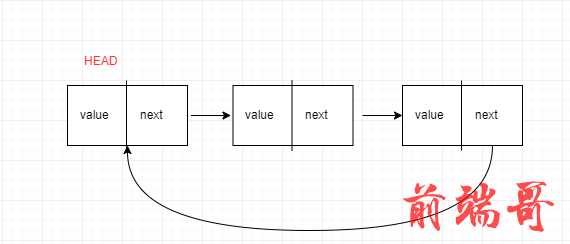
单向循环链表和单向链表的区别在于最后一个元素的next不是指向undefined,而是指向了head。
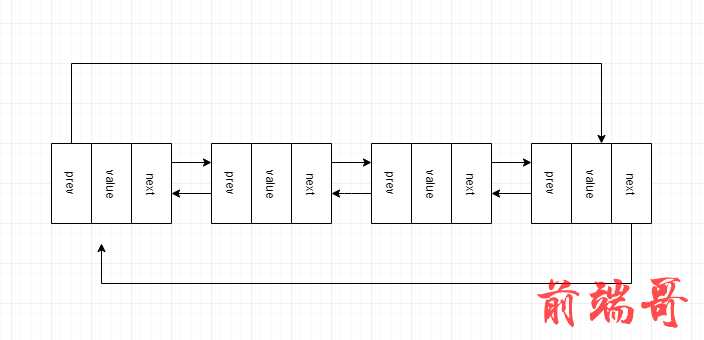
双向循环链表是双向链表多了指向head元素的tail.next(原本是undefined)和指向tail元素的head.prev(原本是undefined)
单向循环链表CircularLinkedList实现:
CircularLinkedList类不需要任何额外的属性。直接扩展LinkedList类(单向链表)并覆盖插入方法和移除方法。
向单向循环链表中插入元素的逻辑和向单向链表中插入元素的逻辑是一样的。不同之处在于我们需要将循环链表尾部节点的next引用指向头部节点。
单向链表:
insert(element, index) { if (index >= 0 && index <= this.count) { const node = new Node(element); if (index === 0) { const current = this.head; node.next = current; this.head = node; } else { const previous = this.getElementAt(index - 1); node.next = previous.next; previous.next = node; } this.count++; return true; } return false; }
循环单向链表:
insert(element, index) { if (index >= 0 && index <= this.count) { const node = new Node(element); let current = this.head; if (index === 0) { if (this.head == null) { // if no node in list this.head = node; node.next = this.head; } else { node.next = current; current = this.getElementAt(this.size()); // update last element this.head = node; current.next = this.head; } } else { const previous = this.getElementAt(index - 1); node.next = previous.next; previous.next = node; } this.count++; return true; } return false; }
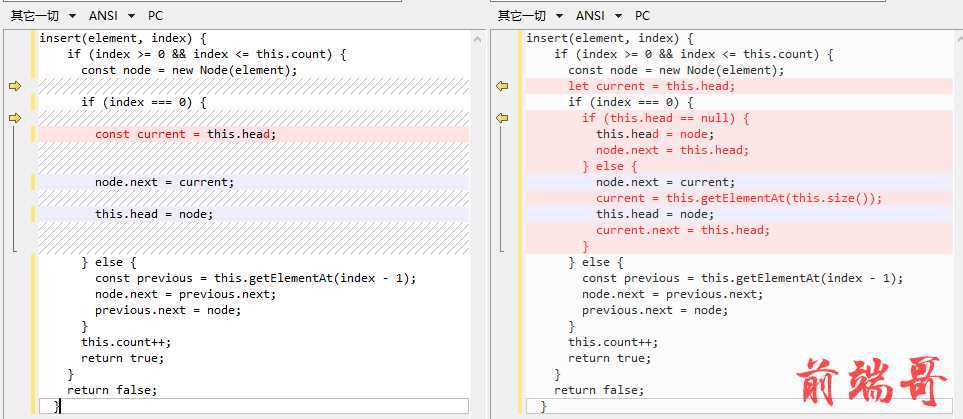
其实就是多了在插入下标为0的情况处理
单向链表:
removeAt(index) { if (index >= 0 && index < this.count) { let current = this.head; if (index === 0) { this.head = current.next; } else { const previous = this.getElementAt(index - 1); current = previous.next; previous.next = current.next; } this.count--; return current.element; } return undefined; }
单向循环链表:
removeAt(index) { if (index >= 0 && index < this.count) { let current = this.head; if (index === 0) { if (this.size() === 1) { this.head = undefined; } else { const removed = this.head; current = this.getElementAt(this.size() - 1); this.head = this.head.next; current.next = this.head; current = removed; } } else { // no need to update last element for circular list const previous = this.getElementAt(index - 1); current = previous.next; previous.next = current.next; } this.count--; return current.element; } return undefined; }
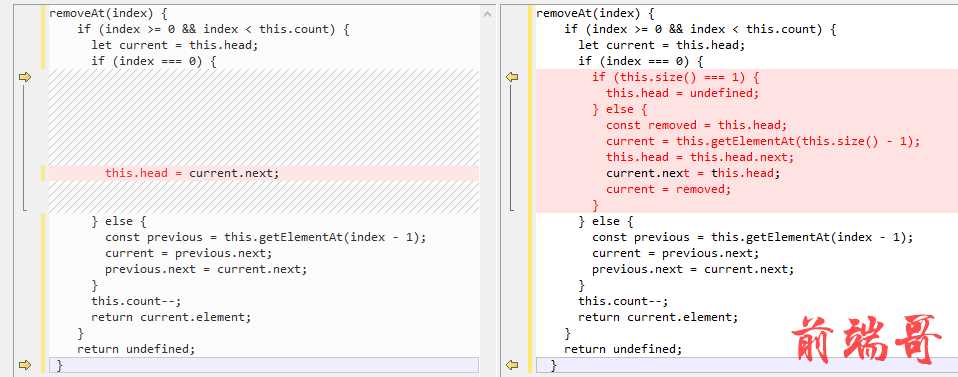
详细代码见:链表代码汇总
有序链表
有序链表是指保持元素有序的链表结构。除了使用排序算法之外。我们还可以将元素插入到正确的位置来保证链表的有序性。
所以我们只需要在单向链表的基础上重写insert、push的逻辑,使得整个链表的插入变得有序。
insert(element, index) { if (index >= 0 && index <= this.count) { const node = new Node(element); if (index === 0) { const current = this.head; node.next = current; this.head = node; } else { const previous = this.getElementAt(index - 1); node.next = previous.next; previous.next = node; } this.count++; return true; } return false; }
原本的插入逻辑可以自定义插入的位置。但是有序插入只能通过计算得出插入下标。
为了提现有序,我们需要定义一套比较方法。
export const Compare = { LESS_THAN: -1, BIGGER_THAN: 1, EQUALS: 0 }; export function defaultCompare(a, b) { if (a === b) { return Compare.EQUALS; } return a < b ? Compare.LESS_THAN : Compare.BIGGER_THAN; }
export default class SortedLinkedList extends LinkedList { constructor(equalsFn, compareFn = defaultCompare) { super(equalsFn); this.compareFn = compareFn; } }
我们来看insert的改写:
insert(element, index = 0) { if (this.isEmpty()) { return super.insert(element, index === 0 ? index : 0); } const pos = this.getIndexNextSortedElement(element); return super.insert(element, pos); }
insert方法为什么要给insert一个默认值0?
因为我们需要继承改写insert方法(super),所以我们不能改变继承的insert的传参结构。但是我们又不能让index生效。
getIndexNextSortedElement的方法是为了纠正插入元素的下标的
getIndexNextSortedElement(element) { let current = this.head; let i = 0; for (; i < this.size() && current; i++) { const comp = this.compareFn(element, current.element); if (comp === Compare.LESS_THAN) { return i; } current = current.next; } return i; }
同理,push也需要纠正一下push的下标
push(element) { if (this.isEmpty()) { super.push(element); } else { const index = this.getIndexNextSortedElement(element); super.insert(element, index); } }
完整代码见链表代码汇总
小结:
链表相比数组最重要的优点是无需移动链表中的元素,就能轻松添加和移除元素。当你需要频繁操作(删、增)元素的时候,最好的选择就是链表。

