文章目录

- 以下是一个
html + echarts的案例
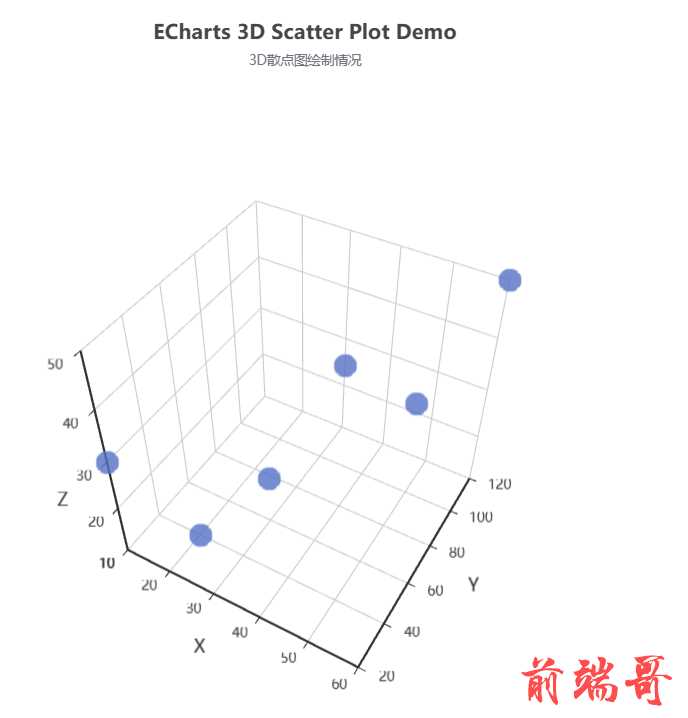
<!DOCTYPE html> <html> <head> <meta charset="utf-8"> <title>ECharts 3D Scatter Plot Demo</title> <!-- 引入 ECharts --> <script src="https://cdnjs.cloudflare.com/ajax/libs/echarts/4.9.0/echarts.min.js"></script> </head> <body> <!-- 绘制 3D 散点图的容器 --> <div id="scatter-chart" style="width: 720px; height: 480px;"></div> <script> // 3D 散点图的数据格式,包含三个维度坐标信息和额外的数据 var data = [ [10, 20, 30, 'data1'], [20, 40, 10, 'data2'], [30, 60, 20, 'data3'], [40, 80, 40, 'data4'], [50, 100, 30, 'data5'], [60, 120, 50, 'data6'] ]; // 基于准备好的dom,初始化echarts实例 var myChart = echarts.init(document.getElementById('scatter-chart')); // 绘制3D散点图 myChart.setOption({ // 图表标题 title: { text: 'ECharts 3D Scatter Plot Demo' }, // 图表类型,3D散点图 series: [{ type: 'scatter3D', // 数据 data: data, // 点大小 symbolSize: 20, // 控制点的透明度 itemStyle: { opacity: 0.8 } }], // X轴的3D坐标系,相关设置 xAxis3D: { type: 'value', scale: true }, // Y轴的3D坐标系,相关设置 yAxis3D: { type: 'value', scale: true }, // Z轴的3D坐标系,相关设置 zAxis3D: { type: 'value', scale: true }, // 旋转3D图表 grid3D: { viewControl: { // 摄像机视角 alpha: 45, beta: 30 } } }); </script> </body> </html>
- 以下是一个
vue+echarts的案例
- index.vue
<!-- * @Description: file content * @Version: 2.0 * @Autor: Hu Kang * @Date: 2023-04-04 18:49:29 * @LastEditors: Hu Kang * @LastEditTime: 2023-05-10 15:24:28 * @FilePath: \src\views\page\echarts\index.vue --> <template> <div class="content"> <template #title> <icon-home /> 散点图</template> <div> <input type="file" id="inputfile" /> <button @click="readFile()">读取文件</button> </div> <splashes v-if="activeKey === '7'" :chart-data="chartData" /> </div> </template> <script setup lang="ts"> import { ref, reactive, watch, watchEffect, computed, getCurrentInstance, nextTick, defineComponent, toRefs, } from 'vue'; import splashes from './components/splashes.vue'; const chartData = ref() function readFile() { var file = document.getElementById('inputfile').files[0]; // 获取选择的文件 if (!file) return; var reader = new FileReader(); reader.readAsText(file, 'UTF-8'); // 以文本格式读取文件 reader.onload = function (event) { // 取到的文件内容 chartData.value = JSON.parse(event.target.result); } } </script> <style scoped lang="less"> .box-card-component { padding: 0px 20px; .card-header { color: #409eff; font-weight: bold; display: flex; justify-content: space-between; // height: 20px; } } </style>
splashes.vue
<!-- * @Description: file content * @Version: 2.0 * @Autor: Hu Kang * @Date: 2023-05-09 16:34:49 * @LastEditors: Hu Kang * @LastEditTime: 2023-05-10 15:08:35 * @FilePath: \src\views\page\echarts\components\splashes.vue --> <template> <div ref="echartsRef" class="content" id="my-div"> </div> </template> <script setup lang="ts"> import { ref, reactive, watch, watchEffect, computed, getCurrentInstance, nextTick, defineComponent, toRefs, onMounted, } from 'vue'; import * as echarts from 'echarts'; import 'echarts-gl' import { RequestType } from 'cesium'; const props = defineProps({ // 数据 chart-data chartData: { type: Object, require: true, default: () => { return {} } }, width: { type: String, default: '98%' }, height: { type: String, default: '67vh' }, autoResize: { type: Boolean, default: true } }) const { chartData } = toRefs(props) // 3D 散点图的数据格式,包含三个维度坐标信息和额外的数据 var data = [ [10, 20, 30, 'data1'], [20, 40, 10, 'data2'], [30, 60, 20, 'data3'], [40, 80, 40, 'data4'], [50, 100, 30, 'data5'], [60, 120, 50, 'data6'] ]; var sizeValue = '57%'; var symbolSize = 2.5; const echartsData = reactive({ option: { // 图表标题 title: { text: 'ECharts 3D Scatter Plot Demo', subtext: '3D散点图绘制情况', left: 'center' }, // 图表类型,3D散点图 series: [{ type: 'scatter3D', // 数据 data: data, // 点大小 symbolSize: 10, // 控制点的透明度 itemStyle: { opacity: 0.8 } }, { type: 'scatter', symbolSize: symbolSize, xAxisIndex: 0, yAxisIndex: 0, encode: { x: 'Income', y: 'Life Expectancy', tooltip: [0, 1, 2, 3, 4] } }, { type: 'scatter', symbolSize: symbolSize, xAxisIndex: 1, yAxisIndex: 1, encode: { x: 'Country', y: 'Income', tooltip: [0, 1, 2, 3, 4] } }, { type: 'scatter', symbolSize: symbolSize, xAxisIndex: 2, yAxisIndex: 2, encode: { x: 'Income', y: 'Population', tooltip: [0, 1, 2, 3, 4] } }, { type: 'scatter', symbolSize: symbolSize, xAxisIndex: 3, yAxisIndex: 3, encode: { x: 'Life Expectancy', y: 'Population', tooltip: [0, 1, 2, 3, 4] } }], // X轴的3D坐标系,相关设置 xAxis3D: { type: 'value', scale: true }, // Y轴的3D坐标系,相关设置 yAxis3D: { type: 'value', scale: true }, // Z轴的3D坐标系,相关设置 zAxis3D: { type: 'value', scale: true }, // 旋转3D图表 grid3D: { viewControl: { // 摄像机视角 alpha: 45, beta: 30 } }, grid: [ { left: '2%', width: '20%', bottom: sizeValue }, { left: '80%', width: '20%', bottom: sizeValue }, { left: '2%', width: '20%', top: sizeValue }, { left: '80%', width: '20%', top: sizeValue } ], xAxis: [ { type: 'value', gridIndex: 0, name: 'Income', axisLabel: { rotate: 50, interval: 0 } }, { type: 'category', gridIndex: 1, name: 'Country', boundaryGap: false, axisLabel: { rotate: 50, interval: 0 } }, { type: 'value', gridIndex: 2, name: 'Income', axisLabel: { rotate: 50, interval: 0 } }, { type: 'value', gridIndex: 3, name: 'Life Expectancy', axisLabel: { rotate: 50, interval: 0 } } ], yAxis: [ { type: 'value', gridIndex: 0, name: 'Life Expectancy' }, { type: 'value', gridIndex: 1, name: 'Income' }, { type: 'value', gridIndex: 2, name: 'Population' }, { type: 'value', gridIndex: 3, name: 'Population' } ], dataset: { dimensions: [ 'Income', 'Life Expectancy', 'Population', 'Country', { name: 'Year', type: 'ordinal' } ], source: [] }, } }) const { option } = toRefs(echartsData); const echartsRef = ref<string>(); let echartInstance; watch( chartData, (newValue) => { if (newValue && newValue.data?.length) { option.value.dataset.source = newValue.data } }, { deep: true, immediate: true } ) watch( option, (newValue) => { echartInstance.setOption(newValue); }, { deep: true } ) onMounted(() => { echartInstance = echarts.init(echartsRef.value, 'macarons', { renderer: 'webgl' }); echartInstance.setOption(option.value); }); </script> <style lang="less" scoped> .content { width: 100%; height: 90vh; } </style>
-
使用前需要先安装一下依赖
npm install echarts-gl --save或yarn add echarts-gl -
安装完成后,在代码中引入 echarts-gl 包:
import echarts from 'echarts'; import 'echarts-gl'; -
接下来,你就可以在代码中使用 scatter3D 组件了,具体的使用方法可以参考官方文档。
控制台如果有提示: geo3D exists,是因为你的版本太低了,可以升级一下

-
升级
npm update echarts-gl或yarn upgrade echarts-gl -
如果你是通过 CDN 引入 echarts 和 echarts-gl,可以尝试使用最新的链接,如:
<script src="https://cdn.jsdelivr.net/npm/echarts@latest/dist/echarts.min.js"></script> <script src="https://cdn.jsdelivr.net/npm/echarts-gl@latest/dist/echarts-gl.min.js"></script> -
如果以上方法无效,你还可以尝试手动清空浏览器缓存并重新加载页面,或者删除旧版本 echarts-gl,重新安装最新版本。

