Vue.js 中使用 Canvas
Vue.js 是一个流行的 JavaScript 框架,用于构建用户界面。它提供了一种简洁的方式来管理和渲染数据,同时也支持与其他库和工具的集成。要在 Vue.js 中使用 Canvas,您可以按照以下步骤进行操作:
- 在 Vue.js 项目中引入 Canvas:您可以通过在 HTML 文件中添加
<canvas> 元素来创建 Canvas。然后,在 Vue.js 组件中,使用 ref 属性给 <canvas> 元素命名,以便在 Vue 实例中引用它。
| <template> |
| <canvas ref="myCanvas"></canvas> |
| </template> |
- 在 Vue 实例中操作 Canvas:在 Vue 组件的
mounted 钩子函数中,可以获取到 <canvas> 元素的引用,并在其中进行绘图操作。
| <script> |
| export default { |
| mounted() { |
| const canvas = this.$refs.myCanvas; |
| const ctx = canvas.getContext('2d'); |
| |
| |
| ctx.fillStyle = 'red'; |
| ctx.fillRect(0, 0, canvas.width, canvas.height); |
| } |
| } |
| </script> |
在上述示例中,我们通过 this.$refs.myCanvas 获取到了 <canvas> 元素的引用,并使用 getContext('2d') 方法获取到了 2D 绘图上下文。然后,我们使用 fillStyle 属性设置了填充颜色为红色,使用 fillRect() 方法绘制了一个填充整个 Canvas 的矩形。
常用方法的使用
getContext('2d'):获取 2D 绘图上下文。它返回一个用于在 Canvas 上进行绘图操作的上下文对象。
| const canvas = document.getElementById('myCanvas'); |
| const ctx = canvas.getContext('2d'); |
beginPath():开始一个新的路径。它用于定义一个路径,路径可以包含直线、曲线、弧线等。
closePath():闭合路径。它将当前路径的起点和终点连接起来,形成一个闭合的图形。
lineTo(x, y):添加一条直线到指定的坐标点。它用于在路径中添加一个直线段。
rect(x, y, width, height):创建一个矩形路径。它用于在路径中添加一个矩形。
| ctx.rect(50, 50, 100, 100); |
arc(x, y, radius, startAngle, endAngle, anticlockwise):创建一段圆弧路径。它用于在路径中添加一个圆弧。
| ctx.arc(100, 100, 50, 0, Math.PI * 2, false); |
moveTo(x, y):将路径的起点移动到指定的坐标点。它用于在路径中移动当前位置,而不绘制任何线条。
stroke():绘制路径的边框。它用于根据路径的定义绘制出路径的边框。
下面是一个绘制简单图形的示例代码:
| <canvas id="myCanvas"></canvas> |
| const canvas = document.getElementById('myCanvas'); |
| const ctx = canvas.getContext('2d'); |
| |
| |
| ctx.beginPath(); |
| ctx.rect(50, 50, 100, 100); |
| ctx.closePath(); |
| ctx.stroke(); |
| |
| |
| ctx.beginPath(); |
| ctx.arc(200, 100, 50, 0, Math.PI * 2, false); |
| ctx.closePath(); |
| ctx.stroke(); |
我们首先获取了 <canvas> 元素的引用,并通过 getContext('2d') 方法获取到了 2D 绘图上下文。然后,我们使用 beginPath() 方法开始一个新的路径,使用 rect() 方法绘制一个矩形路径,并使用 closePath() 方法闭合路径并使用 stroke() 方法绘制出矩形的边框。接着,我们再次使用 beginPath() 方法开始一个新的路径,使用 arc() 方法绘制一个圆形路径,并使用 closePath() 方法闭合路径并使用 stroke() 方法绘制出圆形的边框。
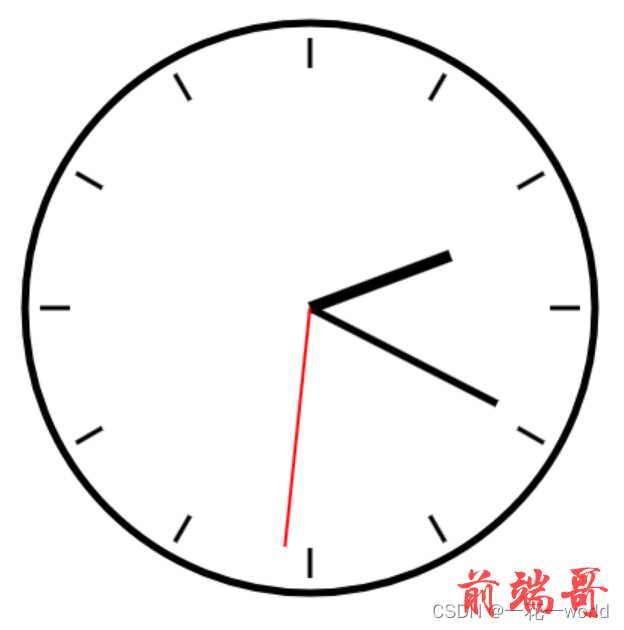
简单的一个时钟效果
可以根据自己喜欢慢慢优化样式,逻辑和绘制代码都有

以下是一个简单的示例代码,展示了如何使用 Canvas 绘制一个时钟效果:
| <canvas id="clockCanvas" width="400" height="400"></canvas> |
| |
| const canvas = document.getElementById('clockCanvas'); |
| const ctx = canvas.getContext('2d'); |
| |
| |
| const centerX = canvas.width / 2; |
| const centerY = canvas.height / 2; |
| |
| |
| function drawClockFace() { |
| ctx.beginPath(); |
| ctx.arc(centerX, centerY, 190, 0, Math.PI * 2); |
| ctx.lineWidth = 5; |
| ctx.strokeStyle = '#000'; |
| ctx.stroke(); |
| ctx.closePath(); |
| } |
| |
| |
| function drawClockTicks() { |
| for (let i = 0; i < 12; i++) { |
| const angle = Math.PI / 6 * i; |
| const x1 = centerX + Math.sin(angle) * 160; |
| const y1 = centerY - Math.cos(angle) * 160; |
| const x2 = centerX + Math.sin(angle) * 180; |
| const y2 = centerY - Math.cos(angle) * 180; |
| |
| ctx.beginPath(); |
| ctx.moveTo(x1, y1); |
| ctx.lineTo(x2, y2); |
| ctx.lineWidth = 3; |
| ctx.strokeStyle = '#000'; |
| ctx.stroke(); |
| ctx.closePath(); |
| } |
| } |
| |
| |
| function drawClockHands() { |
| const now = new Date(); |
| const hours = now.getHours(); |
| const minutes = now.getMinutes(); |
| const seconds = now.getSeconds(); |
| |
| |
| const hourAngle = Math.PI / 6 * (hours % 12) + Math.PI / 360 * minutes; |
| const hourHandLength = 100; |
| const hourX = centerX + Math.sin(hourAngle) * hourHandLength; |
| const hourY = centerY - Math.cos(hourAngle) * hourHandLength; |
| |
| ctx.beginPath(); |
| ctx.moveTo(centerX, centerY); |
| ctx.lineTo(hourX, hourY); |
| ctx.lineWidth = 8; |
| ctx.strokeStyle = '#000'; |
| ctx.stroke(); |
| ctx.closePath(); |
| |
| |
| const minuteAngle = Math.PI / 30 * minutes + Math.PI / 1800 * seconds; |
| const minuteHandLength = 140; |
| const minuteX = centerX + Math.sin(minuteAngle) * minuteHandLength; |
| const minuteY = centerY - Math.cos(minuteAngle) * minuteHandLength; |
| |
| ctx.beginPath(); |
| ctx.moveTo(centerX, centerY); |
| ctx.lineTo(minuteX, minuteY); |
| ctx.lineWidth = 5; |
| ctx.strokeStyle = '#000'; |
| ctx.stroke(); |
| ctx.closePath(); |
| |
| |
| const secondAngle = Math.PI / 30 * seconds; |
| const secondHandLength = 160; |
| const secondX = centerX + Math.sin(secondAngle) * secondHandLength; |
| const secondY = centerY - Math.cos(secondAngle) * secondHandLength; |
| |
| ctx.beginPath(); |
| ctx.moveTo(centerX, centerY); |
| ctx.lineTo(secondX, secondY); |
| ctx.lineWidth = 2; |
| ctx.strokeStyle = '#f00'; |
| ctx.stroke(); |
| ctx.closePath(); |
| } |
| |
| |
| function drawClock() { |
| ctx.clearRect(0, 0, canvas.width, canvas.height); |
| |
| drawClockFace(); |
| drawClockTicks(); |
| drawClockHands(); |
| |
| requestAnimationFrame(drawClock); |
| } |
| |
| |
| drawClock(); |
这个示例代码中,我们首先获取了 <canvas> 元素的引用,并通过 getContext('2d') 方法获取到了 2D 绘图上下文。然后,我们定义了一些函数来绘制时钟的各个部分。drawClockFace() 函数用于绘制时钟的外圆,drawClockTicks() 函数用于绘制时钟的刻度,drawClockHands() 函数用于绘制时钟的指针。在 drawClockHands() 函数中,我们使用了 new Date() 方法获取当前的时间,并根据小时、分钟和秒钟的值计算出指针的位置。最后,我们使用 requestAnimationFrame() 方法来循环调用 drawClock() 函数,实现时钟的动态效果。


