问题解决
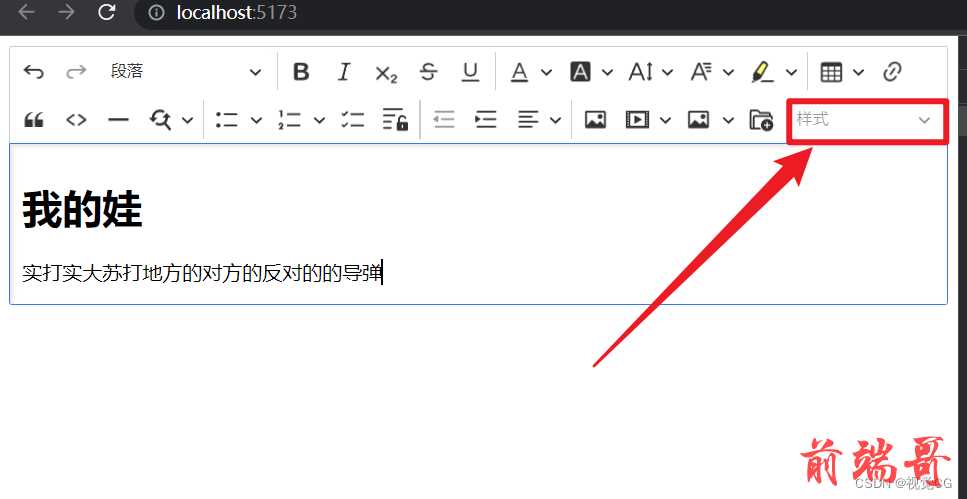
- 如图,这个样式没效果。
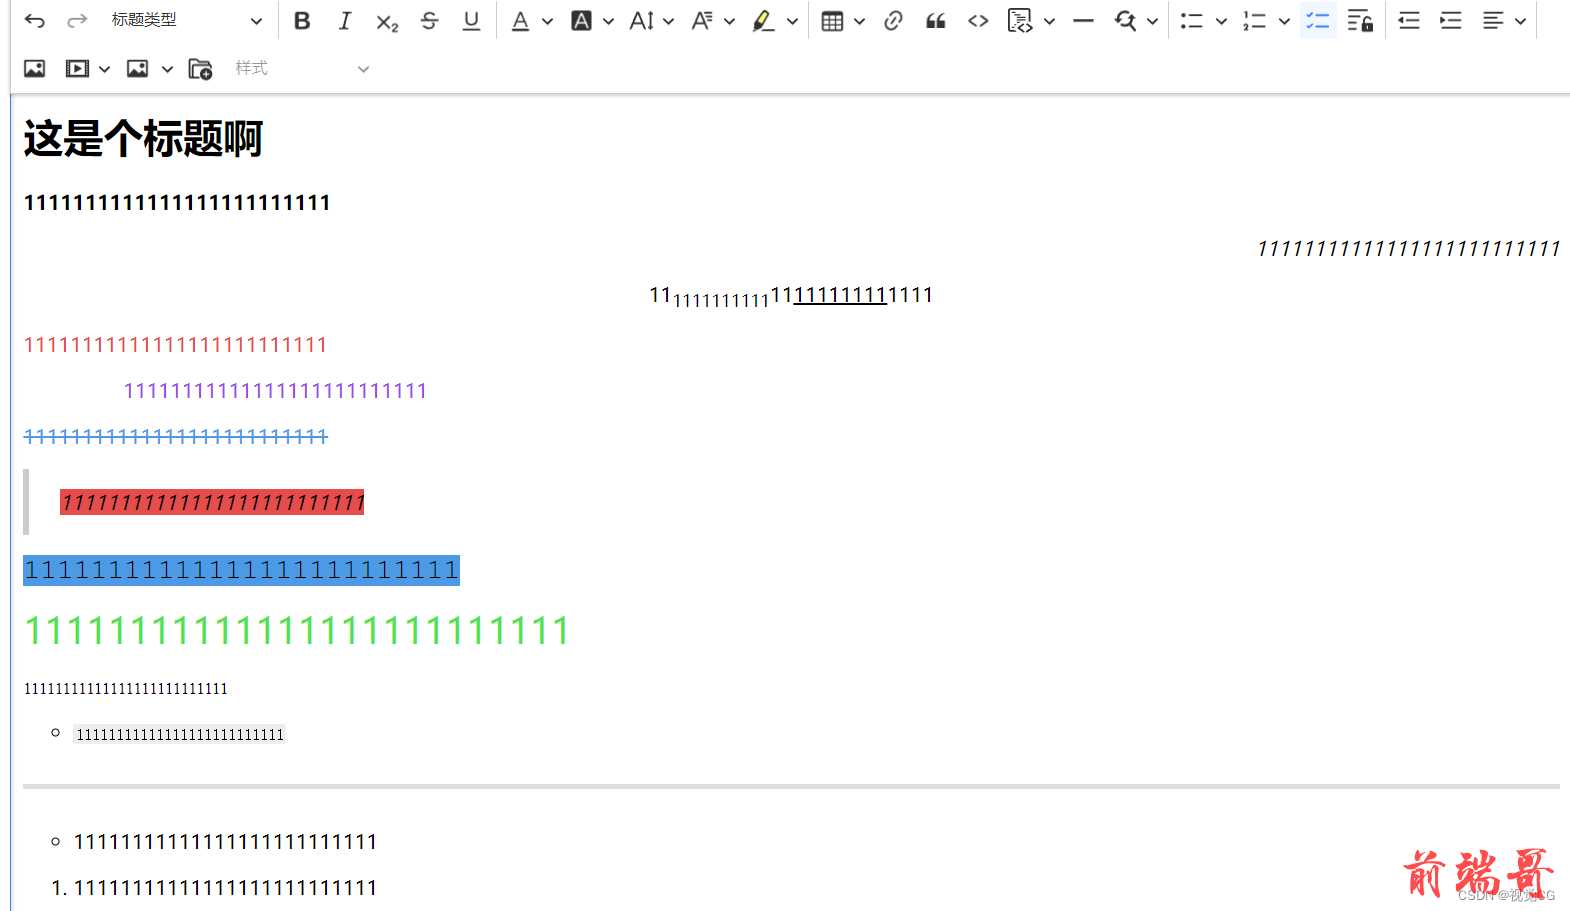
- 解决方法:因为没有导入css,导入css后,配置style插件就生效了。
- 问:你的css哪来的?
- 答:所有的样式与插件CXEditor5官网都可以找到。

配置的css
.ck.ck-content { font-family: 'PT Serif', serif; font-size: 16px; line-height: 1.6; padding: 2em; } .ck-content .ck-horizontal-line { margin-bottom: 1em; } .ck.ck-content hr { width: 100px; border-top: 1px solid #aaa; height: 1px; margin: 1em auto; } .ck.ck-content h3.category { font-family: 'Bebas Neue'; font-size: 20px; font-weight: bold; color: #d1d1d1; letter-spacing: 10px; margin: 0; padding: 0; } .ck.ck-content h2.document-title { font-family: 'Bebas Neue'; font-size: 50px; font-weight: bold; margin: 0; padding: 0; border: 0; } .ck.ck-content h3.document-subtitle { font-size: 20px; color: #e91e63; margin: 0 0 1em; font-weight: normal; padding: 0; } .ck.ck-content p.info-box { --background-size: 30px; --background-color: #e91e63; padding: 1.2em 2em; border: 1px solid var(--background-color); background: linear-gradient(135deg, var(--background-color) 0%, var(--background-color) var(--background-size), transparent var(--background-size)), linear-gradient(135deg, transparent calc(100% - var(--background-size)), var(--background-color) calc(100% - var(--background-size)), var(--background-color)); border-radius: 10px; margin: 1.5em 2em; box-shadow: 5px 5px 0 #ffe6ef; } .ck.ck-content blockquote.side-quote { font-family: 'Bebas Neue'; font-style: normal; float: right; width: 35%; position: relative; border: 0; overflow: visible; z-index: 1; margin-left: 1em; } .ck.ck-content blockquote.side-quote::before { content: "“"; position: absolute; top: -37px; left: -10px; display: block; font-size: 200px; color: #e7e7e7; z-index: -1; line-height: 1; } .ck.ck-content blockquote.side-quote p { font-size: 2em; line-height: 1; } .ck.ck-content blockquote.side-quote p:last-child:not(:first-child) { font-size: 1.3em; text-align: right; color: #555; } .ck.ck-content span.marker { background: yellow; } .ck.ck-content span.spoiler { background: #000; color: #000; } .ck.ck-content span.spoiler:hover { background: #000; color: #fff; } .ck.ck-content pre.fancy-code { border: 0; margin-left: 2em; margin-right: 2em; border-radius: 10px; } .ck.ck-content pre.fancy-code::before { content: ""; display: block; height: 13px; background: url(data:image/svg+xml;base64,PHN2ZyBmaWxsPSJub25lIiB4bWxucz0iaHR0cDovL3d3dy53My5vcmcvMjAwMC9zdmciIHZpZXdCb3g9IjAgMCA1NCAxMyI+CiAgPGNpcmNsZSBjeD0iNi41IiBjeT0iNi41IiByPSI2LjUiIGZpbGw9IiNGMzZCNUMiLz4KICA8Y2lyY2xlIGN4PSIyNi41IiBjeT0iNi41IiByPSI2LjUiIGZpbGw9IiNGOUJFNEQiLz4KICA8Y2lyY2xlIGN4PSI0Ny41IiBjeT0iNi41IiByPSI2LjUiIGZpbGw9IiM1NkM0NTMiLz4KPC9zdmc+Cg==); margin-bottom: 8px; background-repeat: no-repeat; } .ck.ck-content pre.fancy-code-dark { background: #272822; color: #fff; box-shadow: 5px 5px 0 #0000001f; } .ck.ck-content pre.fancy-code-bright { background: #dddfe0; color: #000; box-shadow: 5px 5px 0 #b3b3b3; }
- 效果图↓
↓
↓
↓
注意:这里又有问题了,这仅仅是在编辑时的视图,当我们预览效果时:↓
可以看到预览没有红色框效果。

解决方法: 点我查看解决方式
常用例子与API
更新/保存
选择全部内容
CKEditor5常见问题
调整编辑器高度
.ck.ck-content:not(.ck-comment__input *) { height: 300px; overflow-y: auto; }
预览与编辑时的样式不一样解决方式
问题所在: ↓
- 我们编辑时,样式非常好看,非常nice ↓


- 渲染页面后 ↓
- 这和我们编辑时的样式不一样.

解决↓
- CKEditor 5有很多插件,几乎每个插件都有自己的css样式,展示前先把所有css样式加载进来.
- 问:官方那么多插件,一个一个复制插件样式,得搞到啥时候?
- 答:通过webpack打包所有插件css样式,然后导入渲染 / 编辑页面.
打包方式如下 ↓
↓
↓
用webpack打包CKEditor5所有css样式
- 安装依赖 ,安装的依赖在上章节克隆的Ckeditor5项目中安装,上章节传送门 → 我是传送门
npm install --save mini-css-extract-plugin css-loader@5
- 配置webpack,这个webpack也是克隆的Ckeditor5项目中。
const MiniCssExtractPlugin = require( 'mini-css-extract-plugin' ); module.exports = { // ... plugins: [ // ... new MiniCssExtractPlugin( { filename: 'styles.css' } ) ], module: { rules: [ { test: /ckeditor5-[^/\\]+[/\\]theme[/\\]icons[/\\][^/\\]+\.svg$/, use: [ 'raw-loader' ] }, { test: /ckeditor5-[^/\\]+[/\\]theme[/\\].+\.css$/, use: [ MiniCssExtractPlugin.loader, 'css-loader', { loader: 'postcss-loader', options: { postcssOptions: styles.getPostCssConfig( { themeImporter: { themePath: require.resolve( '@ckeditor/ckeditor5-theme-lark' ) }, minify: true } ) } } ] } ] } };
- 我的webpack完整配置参考如下下↓
↓
↓
/** * @license Copyright (c) 2003-2022, CKSource Holding sp. z o.o. All rights reserved. * For licensing, see LICENSE.md or https://ckeditor.com/legal/ckeditor-oss-license */ 'use strict'; /* eslint-env node */ const path = require('path'); const webpack = require('webpack'); const { bundler, styles } = require('@ckeditor/ckeditor5-dev-utils'); const CKEditorWebpackPlugin = require('@ckeditor/ckeditor5-dev-webpack-plugin'); const TerserPlugin = require('terser-webpack-plugin'); const MiniCssExtractPlugin = require('mini-css-extract-plugin'); module.exports = { devtool: 'source-map', performance: { hints: false }, entry: path.resolve(__dirname, 'src', 'ckeditor.js'), output: { // The name under which the editor will be exported. library: 'ClassicEditor', path: path.resolve(__dirname, 'build'), filename: 'ckeditor.js', libraryTarget: 'umd', libraryExport: 'default' }, optimization: { minimizer: [ new TerserPlugin({ sourceMap: true, terserOptions: { output: { // Preserve CKEditor 5 license comments. comments: /^!/ } }, extractComments: false }) ] }, plugins: [ new CKEditorWebpackPlugin({ // UI language. Language codes follow the https://en.wikipedia.org/wiki/ISO_639-1 format. // When changing the built-in language, remember to also change it in the editor's configuration (src/ckeditor.js). language: 'zh-cn', additionalLanguages: 'all' }), new webpack.BannerPlugin({ banner: bundler.getLicenseBanner(), raw: true }), //css样式插件 new MiniCssExtractPlugin({ filename: 'styles.css' }) ], module: { rules: [ { test: /\.svg$/, use: ['raw-loader'] }, { test: /\.css$/, use: [ { loader: 'style-loader', options: { injectType: 'singletonStyleTag', attributes: { 'data-cke': true } } }, 'css-loader', { loader: 'postcss-loader', options: { postcssOptions: styles.getPostCssConfig({ themeImporter: { themePath: require.resolve('@ckeditor/ckeditor5-theme-lark') }, minify: true }) } } ] }, { test: /\.ts$/, use: ['ts-loader'] } ], //框架css rules: [ { test: /ckeditor5-[^/\\]+[/\\]theme[/\\]icons[/\\][^/\\]+\.svg$/, use: ['raw-loader'] }, { test: /ckeditor5-[^/\\]+[/\\]theme[/\\].+\.css$/, use: [ MiniCssExtractPlugin.loader, 'css-loader', { loader: 'postcss-loader', options: { postcssOptions: styles.getPostCssConfig({ themeImporter: { themePath: require.resolve('@ckeditor/ckeditor5-theme-lark') }, minify: true }) } } ] } ] }, resolve: { extensions: ['.ts', '.js', '.json'] } };
↓
- 配置好webpack后,执行nmp run build ,会多出一个css样式↓
↓

- 将样式复制到要渲染 / 编辑器的html页面,并把打包的css加载进来

- 重点来了,把getData()获取到的数据添加到class为
ck-content的div里↓
- 一定要在外面套个class为
ck-content的div,不然就算引进打包的css,样式一样不生效.

↓
↓
↓
- 例:

↓
- 查看展示的页面↓
↓
- 展示的页面与我们编辑时的一模一样.

官方的参考例子 option-extracting-css
CKEDitor5 唯一单独的css ↓
如下所示↓
↓
↓
CKEditor5 的导航样式 | 编辑时与预览时样式不一致(经过处理的css)
- 问题: 编辑与预览的样式不一致,导入以下经过处理的css即可。

.ck.ck-content, .ck-content { font-family: 'PT Serif', serif; font-size: 16px; line-height: 1.6; padding: 2em; } .ck-content .ck-horizontal-line { margin-bottom: 1em; } .ck.ck-content hr, .ck-content hr { width: 100px; border-top: 1px solid #aaa; height: 1px; margin: 1em auto; } .ck.ck-content h3.category, .ck-content h3.category { font-family: 'Bebas Neue'; font-size: 20px; font-weight: bold; color: #d1d1d1; letter-spacing: 10px; margin: 0; padding: 0; } .ck.ck-content h2.document-title, .ck-content h2.document-title { font-family: 'Bebas Neue'; font-size: 50px; font-weight: bold; margin: 0; padding: 0; border: 0; } .ck.ck-content h3.document-subtitle, .ck-content h3.document-subtitle { font-size: 20px; color: #e91e63; margin: 0 0 1em; font-weight: normal; padding: 0; } .ck.ck-content p.info-box, .ck-content p.info-box { --background-size: 30px; --background-color: #e91e63; padding: 1.2em 2em; border: 1px solid var(--background-color); background: linear-gradient(135deg, var(--background-color) 0%, var(--background-color) var(--background-size), transparent var(--background-size)), linear-gradient(135deg, transparent calc(100% - var(--background-size)), var(--background-color) calc(100% - var(--background-size)), var(--background-color)); border-radius: 10px; margin: 1.5em 2em; box-shadow: 5px 5px 0 #ffe6ef; } .ck.ck-content blockquote.side-quote, .ck-content blockquote.side-quote { font-family: 'Bebas Neue'; font-style: normal; float: right; width: 35%; position: relative; border: 0; overflow: visible; z-index: 1; margin-left: 1em; } .ck.ck-content blockquote.side-quote::before, .ck-content blockquote.side-quote::before { content: "“"; position: absolute; top: -37px; left: -10px; display: block; font-size: 200px; color: #e7e7e7; z-index: -1; line-height: 1; } .ck.ck-content blockquote.side-quote p, .ck-content blockquote.side-quote p { font-size: 2em; line-height: 1; } .ck.ck-content blockquote.side-quote p:last-child:not(:first-child), .ck-content blockquote.side-quote p:last-child:not(:first-child) { font-size: 1.3em; text-align: right; color: #555; } .ck.ck-content span.marker, .ck-content span.marker { background: yellow; } .ck.ck-content span.spoiler, .ck-content span.spoiler { background: #000; color: #000; } .ck.ck-content span.spoiler:hover, .ck-content span.spoiler:hover { background: #000; color: #fff; } .ck.ck-content pre.fancy-code, .ck-content pre.fancy-code { border: 0; margin-left: 2em; margin-right: 2em; border-radius: 10px; } .ck.ck-content pre.fancy-code::before, .ck-content pre.fancy-code::before { content: ""; display: block; height: 13px; background: url(data:image/svg+xml;base64,PHN2ZyBmaWxsPSJub25lIiB4bWxucz0iaHR0cDovL3d3dy53My5vcmcvMjAwMC9zdmciIHZpZXdCb3g9IjAgMCA1NCAxMyI+CiAgPGNpcmNsZSBjeD0iNi41IiBjeT0iNi41IiByPSI2LjUiIGZpbGw9IiNGMzZCNUMiLz4KICA8Y2lyY2xlIGN4PSIyNi41IiBjeT0iNi41IiByPSI2LjUiIGZpbGw9IiNGOUJFNEQiLz4KICA8Y2lyY2xlIGN4PSI0Ny41IiBjeT0iNi41IiByPSI2LjUiIGZpbGw9IiM1NkM0NTMiLz4KPC9zdmc+Cg==); margin-bottom: 8px; background-repeat: no-repeat; } .ck.ck-content pre.fancy-code-dark, .ck-content pre.fancy-code-dark { background: #272822; color: #fff; box-shadow: 5px 5px 0 #0000001f; } .ck.ck-content pre.fancy-code-bright, .ck-content pre.fancy-code-bright { background: #dddfe0; color: #000; box-shadow: 5px 5px 0 #b3b3b3; } :last-child:not(:first-child) { font-size: 1.3em; text-align: right; color: #555; } .ck.ck-content span.marker, .ck-content span.marker { background: yellow; } .ck.ck-content span.spoiler, .ck-content span.spoiler { background: #000; color: #000; } .ck.ck-content span.spoiler:hover, .ck-content span.spoiler:hover { background: #000; color: #fff; } .ck.ck-content pre.fancy-code, .ck-content pre.fancy-code { border: 0; margin-left: 2em; margin-right: 2em; border-radius: 10px; } .ck.ck-content pre.fancy-code::before, .ck-content pre.fancy-code::before { content: ""; display: block; height: 13px; background: url(data:image/svg+xml;base64,PHN2ZyBmaWxsPSJub25lIiB4bWxucz0iaHR0cDovL3d3dy53My5vcmcvMjAwMC9zdmciIHZpZXdCb3g9IjAgMCA1NCAxMyI+CiAgPGNpcmNsZSBjeD0iNi41IiBjeT0iNi41IiByPSI2LjUiIGZpbGw9IiNGMzZCNUMiLz4KICA8Y2lyY2xlIGN4PSIyNi41IiBjeT0iNi41IiByPSI2LjUiIGZpbGw9IiNGOUJFNEQiLz4KICA8Y2lyY2xlIGN4PSI0Ny41IiBjeT0iNi41IiByPSI2LjUiIGZpbGw9IiM1NkM0NTMiLz4KPC9zdmc+Cg==); margin-bottom: 8px; background-repeat: no-repeat; } .ck.ck-content pre.fancy-code-dark, .ck-content pre.fancy-code-dark { background: #272822; color: #fff; box-shadow: 5px 5px 0 #0000001f; } .ck.ck-content pre.fancy-code-bright, .ck-content pre.fancy-code-bright { background: #dddfe0; color: #000; box-shadow: 5px 5px 0 #b3b3b3; }
- 效果图,成功渲染样式

getData()与setData() 获取编辑的文本与设置文本
- editor.getData() 获取编辑框内的数据
- 应用场景:当我们编辑完内容,要发布时,可以使用该方法获取编辑的内容.
- editor.setData(data) 将数据设置到编辑框内
- data 设置的数据
- 应用场景:当我们要更改某个页面的内容时,可用该方法将数据设置到编辑框
vue3获取编辑的文本
在vue3中,获取编辑的数据是editoring,直接this.editoring就可以获取编辑的数据

CKeditor5相关推荐
ckeditor5安装与使用
End
2022/12/14 14:55 一次修改

