
下一篇:常用插件(2):vue3-hash-calendar 日期时间选择插件、基于Vue的组织架构图组件、lodash、radash、vue-esign 手写电子签名、vue-currency-input
1、vue-count-to:数字滚动插件
vue-count-to是一个没有依赖的轻量级vue组件,可以自行覆盖EasingFn。 可以设置 startVal 和 endVal,它会自动判断计数进行数字渲染。 支持vue-ssr。vue-count-to参考于countUp.js;
github 地址: https://github.com/PanJiaChen/vue-countTo/tree/master?tab=readme-ov-file

使用教程: vue-count-to–数字滚动插件
安装使用:
npm install vue-count-to
<template> <countTo :startVal='startVal' :endVal='endVal' :duration='3000'></countTo> </template> <script> import countTo from 'vue-count-to'; export default { components: { countTo }, data () { return { startVal: 0, endVal: 2017 } } } </script>
vue-count-to 实际编译出来的就是个 span 标签,所以我们在给其写样式的时候可以直接用span标签。
参数选项:

注意:当autoplay:true时,它将在startVal或endVal更改时自动启动
功能:

2、vue-seamless-scroll: 一个简单的基于vue.js的无缝滚动
vue-seamless-scroll 目前支持上下左右无缝滚动,单步滚动,以及支持水平方向的手动切换功能。
官方文档: https://chenxuan0000.github.io/vue-seamless-scroll/zh/
插件在线演示地址: https://chenxuan1993.gitee.io/component-document/index_prod#/component/seamless-default
下载安装:
npm install vue-seamless-scroll --save
使用教程:
vue-seamless-scroll无缝滚动组件使用方法详解+解决轮播空白缝隙问题(最后面)
vue-seamless-scroll的使用与注意事项


场景: 当前使用vue-seamless-scroll包裹了一个滚动div 的list,当前list中的div需要点击进行其他逻辑处理
问题: 部分div点击不触发点击事件
原因: 因为vue-seamless-scroll中间包裹的dom复制渲染,没有带上dom的事件导致。
解决方式: 使用事件委托。在vue-seamless-scroll外部的div添加点击事件,获取$event的target 。
<div class="scroll-list" v-if="safeData.brandList" @click="handleClick($event)"> <vue-seamless-scroll :data="safeData.brandList" class="seamless-warp" :class-option="classOption" > <div class="flex line-feed"> <div v-for="(item) in safeData.brandList" :key="item.id" :data-obj="JSON.stringify(item)" class="brand-item pointer" > {{ item.name }} </div> </div> </vue-seamless-scroll> </div>
点击传值时,通过data-obj传入
handleClick($event){ const obj =JSON.parse($event.target.dataset.obj) this.showDialog(obj) },
当前场景是需要获取一个对象
如果只需要一个id,或者name的话可以直接通过
:id=“item.id” :name=“item.name”
总结:
- vue中自定义属性格式为 data-xxx
- 获取为:e.target.dataset.xxx
参考: vue-seamless-scroll插件使用后点击事件无效
vue-seamless-scroll 无缝滚动事件用法、@click点击事件失效问题
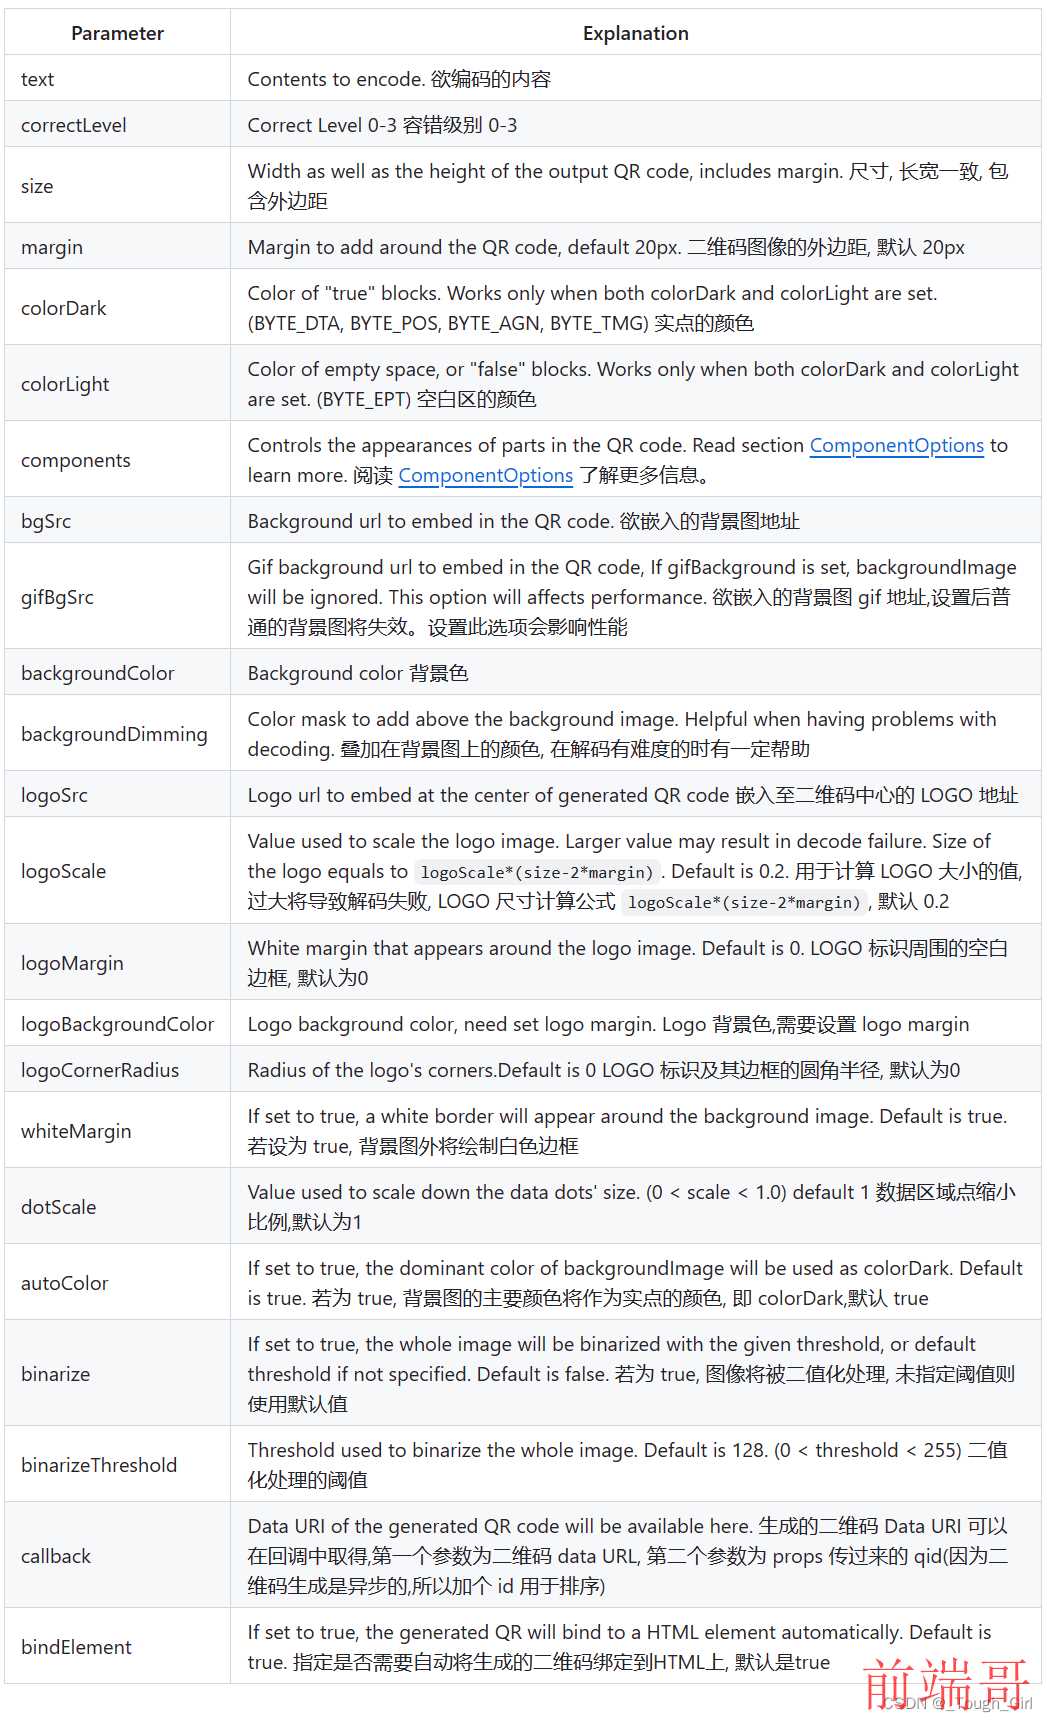
3、vue-qr:Vue生成二维码插件,支持Vue2/Vue3/Vite
vue3+ts 使用插件vue-qr生产二维码图片并下载
vue 使用 vue-qr 插件生成二维码并下载
下载:
npm install vue-qr --save
引入:
// vue2.0 import VueQr from 'vue-qr' // vue3.0 (support vite) import vueQr from 'vue-qr/src/packages/vue-qr.vue' ... { components: {VueQr} }
使用:
<vue-qr text="Hello world!"></vue-qr> <vue-qr :bgSrc='src' :logoSrc="src2" text="Hello world!" :size="200"></vue-qr> <vue-qr text="Hello world!" :callback="test" qid="testid"></vue-qr>
export default { methods:{ test(dataUrl,id){ console.log(url, id) } } }
4、qrcode.vue:一款 Vue.js 二维码组件,同时支持 Vue2 和 Vue3
教程:https://github.com/scopewu/qrcode.vue/blob/main/README-zh_cn.md
vue3 使用 qrcode.vue 生成二维码
下载:
npm install --save qrcode.vue # yarn add qrcode.vue
dist/ |--- qrcode.vue.cjs.js // CommonJS |--- qrcode.vue.esm.js // ES module |--- qrcode.vue.browser.js // UMD for browser or require.js or CommonJS |--- qrcode.vue.browser.min.js // UMD Minimum size
使用:
在单文件扩展 *.vue 中使用:
<template> <qrcode-vue :value="value" :size="size" level="H" /> </template> <script> import QrcodeVue from 'qrcode.vue' export default { data() { return { value: 'https://example.com', size: 300, } }, components: { QrcodeVue, }, } </script>
在 Vue 3 中配合 TypeScript 使用:
<template> <qrcode-vue :value="value" :level="level" :render-as="renderAs" /> </template> <script setup lang="ts"> import { ref } from 'vue' import QrcodeVue from 'qrcode.vue' import type { Level, RenderAs } from 'qrcode.vue' const value = ref<String>('qrcode') const level = ref<Level>('M') const renderAs = ref<RenderAs>('svg') </script>
Component props
| 字段 | 类型 | 默认值 | 描述 |
|---|---|---|---|
| value | string | ‘’ | 二维码的内容值。 |
| size | number | 100 | 二维码大小。 |
| render-as | RenderAs(‘canvas’ | ‘svg’) | canvas |
| margin | number | 0 | 定义空白区的宽度应该是多少。 |
| level | Level(‘L’ | ‘M’ | ‘Q’ |
| background | string | #ffffff | 二维码背景颜色。 |
| foreground | string | #000000 | 二维码前景颜色。 |
| class | string | ‘’ | 传递给二维码根元素的类名。 |
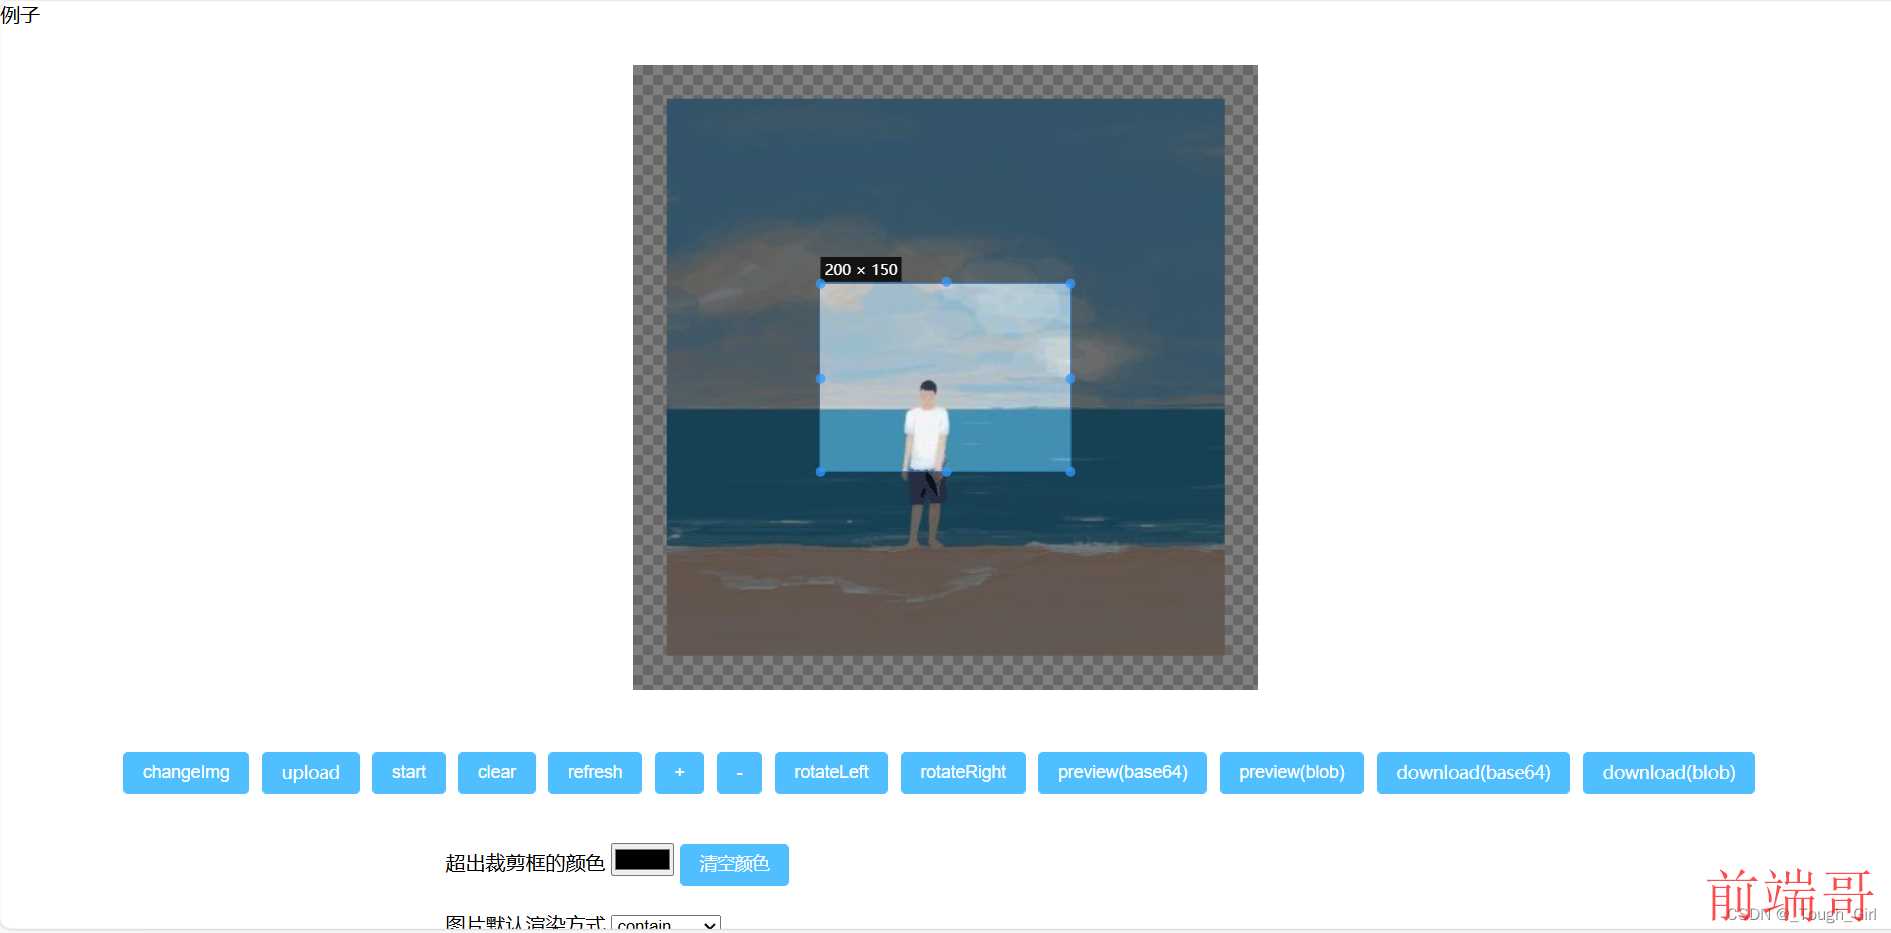
5、vue-cropper:一个优雅的图片裁剪插件
演示demo: https://github.xyxiao.cn/vue-cropper/docs/vue2.html
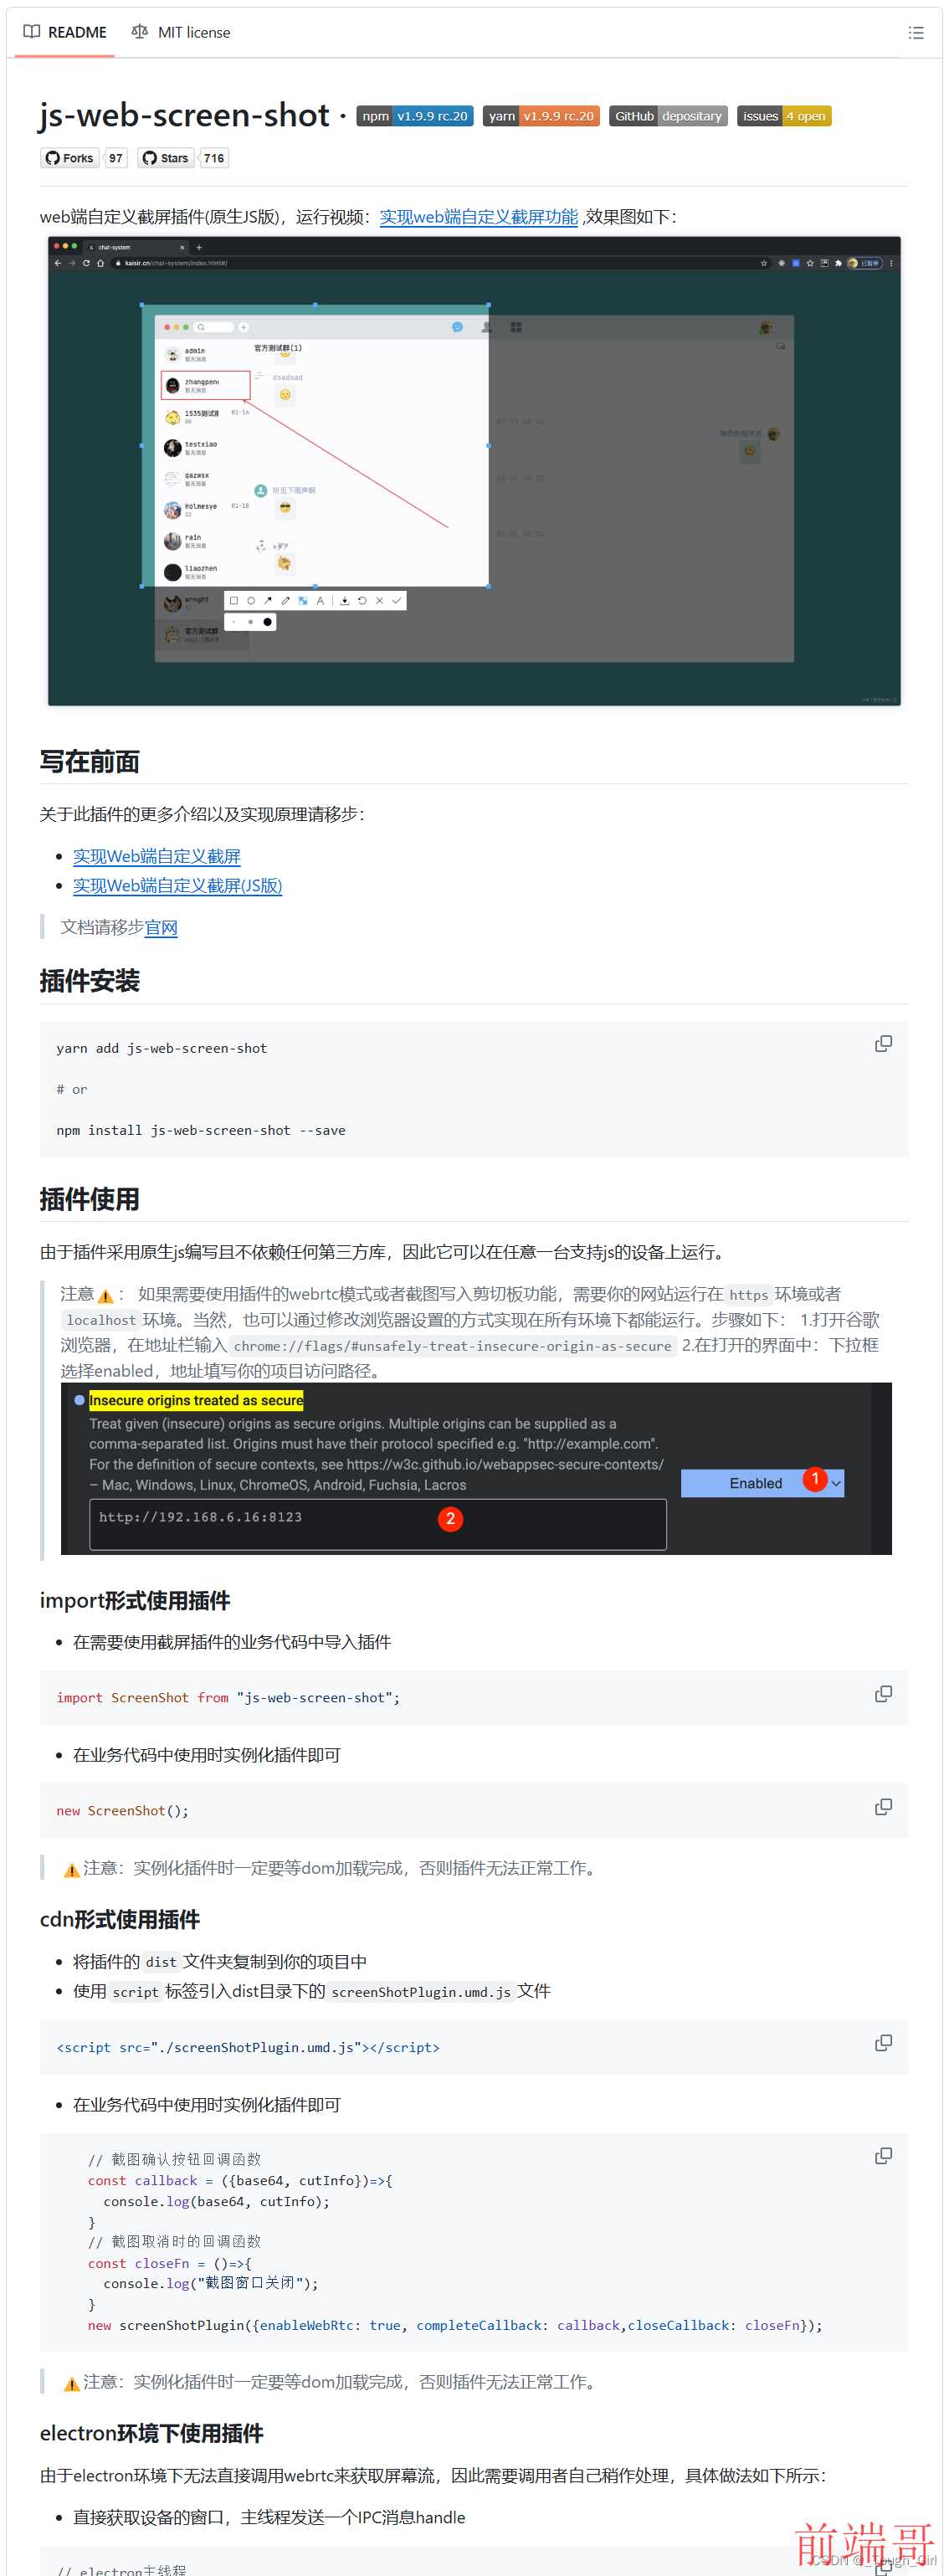
6、js-screen-shot(js-web-screen-shot):一个 用于在web项目 中实现截图功能的库,可以在任意一台支持js的设备上运行
js-web-screen-shot:web端自定义截屏插件(原生JS版)
gitHub地址: https://github.com/likaia/js-screen-shot?tab=readme-ov-file

- 描述: js-web-screen-shot是一款强大的JavaScript插件,专为Web应用设计,能够轻松实现自定义截屏功能。这款插件不仅支持HTML2Canvas模式,还提供了WebRTC模式,以利用浏览器的屏幕共享功能提供更高质量的截图体验。
- 特点: 支持高清截图预览、撤销重做、马赛克、文本添加等功能,且配置灵活,适合不同技术水平的开发者。此外,该插件还提供了详尽的文档和视频教程,方便开发者快速集成。
- 适用场景: 广泛应用于在线教育平台、协作工具、远程办公软件等需要用户上传屏幕快照作为反馈的场合。
使用示例:
screenshot() { console.log("截图"); let pageWidth = document.documentElement.clientWidth || document.body.clientWidth; let pageHeight = document.documentElement.clientHeight || document.body.clientHeight; console.log(pageWidth, pageHeight); const config = { enableWebRtc: true, // canvasWidth: pageWidth, // canvasHeight: pageHeight, clickCutFullScreen: true, wrcWindowMode: true, // 启用窗口截图模式 // 隐藏滚动条 hiddenScrollBar: { state: true, fillState: true, color: "#FFFFFF", }, }; const screenShotHandler = new ScreenShot(config); }

7、vue-web-screen-shot:web端自定义截屏插件(Vue3版)

8、html2canvas:JavaScript截图工具
- 描述: html2canvas是一款利用JavaScript进行屏幕截图的插件,它能够实现在用户浏览器端直接对整个或部分页面进行截屏。这款插件非常适合用于生成网页的截图,并保存到本地或上传到服务器。
- 使用方式: 首先,需要通过npm或yarn安装html2canvas插件。然后,在Vue组件中引入并使用该插件。通过指定需要截图的DOM元素,html2canvas可以将其渲染为一个Canvas对象,进而转换为图片格式(如PNG)并保存或显示。
- 适用场景: 适用于各种需要生成网页截图并保存或分享的场景,如电子证书、电子名片、海报等。
9、modern-screenshot:使用 HTML5 canvas 和 SVG 从 DOM 节点快速生成图像
参考:记一次页面截图需求
项目介绍: modern-screenshot是一款轻量级的JavaScript库,能够让您以数据URL或多种格式(如PNG、SVG、JPEG、WebP)保存网页元素的截图。它源于html-to-image项目,经过优化,提供更现代的解决方案,并支持Singleton上下文和Web Worker,使得连续截图速度更快。
项目技术分析:该项目的核心是将DOM节点转换为可下载的图片。通过使用HTML5 Canvas API和SVG渲染,它可以准确地捕获包括CSS样式、阴影、渐变在内的复杂布局。此外,它还支持Web Worker,从而避免了主线程阻塞,确保截图过程流畅。

options.ts:
export interface Options { /** * Width in pixels to be applied to node before rendering. */ width?: number /** * Height in pixels to be applied to node before rendering. */ height?: number /** * A number between `0` and `1` indicating image quality (e.g. 0.92 => 92%) of the JPEG image. */ quality?: number /** * A string indicating the image format. The default type is image/png; that type is also used if the given type isn't supported. */ type?: string /** * The pixel ratio of captured image. * * DPI = 96 * scale * * default: 1 */ scale?: number /** * A string value for the background color, any valid CSS color value. */ backgroundColor?: string | null /** * An object whose properties to be copied to node's style before rendering. */ style?: Partial<CSSStyleDeclaration> | null /** * A function taking DOM node as argument. Should return `true` if passed * node should be included in the output. Excluding node means excluding * it's children as well. */ filter?: ((el: Node) => boolean) | null /** * Maximum canvas size (pixels). * * https://developer.mozilla.org/en-US/docs/Web/HTML/Element/canvas#maximum_canvas_size */ maximumCanvasSize?: number /** * Load media timeout and fetch remote asset timeout (millisecond). * * default: 30000 */ timeout?: number /** * Embed assets progress. */ progress?: ((current: number, total: number) => void) | null /** * Enable debug mode to view the execution time log. */ debug?: boolean /** * Custom implementation to get image data for a custom URL. * This can be helpful for Capacitor or Cordova when using * native fetch to bypass CORS issues. * * If returns a string, will completely bypass any `Options.fetch` * settings with your custom implementation. * * If returns false, will fall back to normal fetch implementation * * @param url * @returns A data URL for the image */ fetchFn?: (( url: string, ) => Promise<string | false>) | null /** * The options of fetch resources. */ fetch?: { /** * The second parameter of `window.fetch` RequestInit * * default: { * cache: 'force-cache', * } */ requestInit?: RequestInit /** * Set to `true` to append the current time as a query string to URL * requests to enable cache busting. * * default: false */ bypassingCache?: boolean | RegExp /** * A data URL for a placeholder image that will be used when fetching * an image fails. Defaults to an empty string and will render empty * areas for failed images. * * default: data:image/png;base64,R0lGODlhAQABAIAAAAAAAP///yH5BAEAAAAALAAAAAABAAEAAAIBRAA7 */ placeholderImage?: string | ((cloned: HTMLImageElement | SVGImageElement) => string | Promise<string>) } /** * The options of fonts download and embed. */ font?: false | { /** * The preferred font format. If specified all other font formats are ignored. */ preferredFormat?: 'woff' | 'woff2' | 'truetype' | 'opentype' | 'embedded-opentype' | 'svg' | string /** * A CSS string to specify for font embeds. If specified only this CSS will * be present in the resulting image. */ cssText?: string } /** * All enabled features * * default: true */ features?: boolean | { /** * Copy scrollbar css styles * * default: true */ copyScrollbar?: boolean /** * Remove abnormal attributes to cloned node (for normalize XML) * * default: true */ removeAbnormalAttributes?: boolean /** * Remove control characters (for normalize XML) * * default: true */ removeControlCharacter?: boolean /** * Fix svg+xml image decode (for Safari、Firefox) * * default: true */ fixSvgXmlDecode?: boolean /** * Render scrolled children with scrolled content * * default: false */ restoreScrollPosition?: boolean } /** * Canvas `drawImage` interval * is used to fix errors in decoding images in Safari、Firefox * * default: 100 */ drawImageInterval?: number /** * Web Worker script url */ workerUrl?: string | null /** * Web Worker number */ workerNumber?: number /** * Triggered after a node is cloned */ onCloneNode?: ((cloned: Node) => void) | null /** * Triggered after a node is embed */ onEmbedNode?: ((cloned: Node) => void) | null /** * Triggered after a ForeignObjectSvg is created */ onCreateForeignObjectSvg?: ((svg: SVGSVGElement) => void) | null /** * An array of style property names. * Can be used to manually specify which style properties are * included when cloning nodes. * This can be useful for performance-critical scenarios. */ includeStyleProperties?: string[] | null }

