本文由JS老狗原创。
有幸参与本厂APP的鸿蒙化改造,学习了ArkTS以及IDE的相关知识,并有机会在ISSUE上与鸿蒙各路大佬交流,获益颇丰。
本篇文章将从一个Web前端的视角出发,浅谈ArkTS组件开发的基础问题,比如属性传递、插槽、条件渲染等。
创建项目
这个过程简单过一下,不赘述。


组件与页面
创建好项目后,我们会自动跳到初始首页,代码如下:
@Entry @Component struct Index { @State message: string = 'Hello World'; build() { RelativeContainer() { Text(this.message) .id('HelloWorld') .fontSize(50) .fontWeight(FontWeight.Bold) .alignRules({ center: { anchor: '__container__', align: VerticalAlign.Center }, middle: { anchor: '__container__', align: HorizontalAlign.Center } }) } .height('100%') .width('100%') } }
首先注意页面Index是按struct定义。我们在这里不深入讨论struct的含义,照猫画虎即可。主要看前面的装饰器。
- @
Entry表示该页面为一个独立的Page,可通过router进行跳转。 - @
Component对该对象封装之后,即可进行页面渲染,并构建数据->视图的更新,可以看成是一个mvvm结构的模版,类似对React.Component的集成,或者是vue中defineComponent的语法糖。 build渲染,可以对标React组件中的render(),或者vue中的setup()。当使用@Component装饰器之后,必须显式声明该方法,否则会有系统报错。
另外需要注意的是,在build()中仅可以使用声明式的写法,也就是只能使用表达式。可以看成是jsx的一个变体:
// 请感受下面组件函数中 return 之后能写什么 export default () => { return ( <h1>Hello World</h1> ) }
@Component export default struct SomeComponent { build() { // console.log(123) // 这是不行的 Text('Hello World') } }
如果有条件可以打开IDE实际操作体会一下。
独立组件
上面组件的示例代码中,我们并没有使用@Entry装饰器。是的这就足够了,上面的代码就是一个完整组件的声明。
我们把组件单拎出来:


@Component export struct CustomButton { build() { Button('My Button') } }
刚才的首页做一下改造,使用前端惯用的flex布局:
import { CustomButton } from './CustomButton' @Entry @Component struct Index { @State message: string = 'Hello World'; build() { Flex({ direction: FlexDirection.Column, justifyContent: FlexAlign.Center, alignItems: ItemAlign.Center, }) { Text(this.message) .id('HelloWorld') .fontSize(50) .fontWeight(FontWeight.Bold) CustomButton() } .height('100%') .width('100%') } }

最基本的组件定义和使用,就是如此了。
样式簇
与web前端不同,ArkTS没有css,但ArkTS通过链式写法,实现了常用的css样式定义。只要有css方案,基本都可以通过链式写法,把想要的样式点出来。

这样散养的样式并不常用,Web前端会用class来声明样式集。类似的功能,可以通过@Extend和@Styles两个装饰器实现。
Style装饰器
import { CustomButton } from './CustomButton' @Entry @Component struct Index { @State message: string = 'Hello World'; // 声明Style簇 @Styles HelloWorldStyle() { .backgroundColor(Color.Yellow) .border({ width: { bottom: 5 }, color: '#ccc' }) .margin({ bottom: 10 }) } build() { Flex({ direction: FlexDirection.Column, justifyContent: FlexAlign.Center, alignItems: ItemAlign.Center, }) { Text(this.message) .id('HelloWorld') .fontSize(50) .fontWeight(FontWeight.Bold) .HelloWorldStyle() // 注意这里调用样式簇 CustomButton() } .height('100%') .width('100%') } }

@Styles装饰器也可以单独修饰function函数:
@Styles function HelloWorldStyle2() { .backgroundColor(Color.Yellow) .border({ width: { bottom: 5 }, color: '#000' }) .margin({ bottom: 10 }) } @Entry @Component struct Index { //... }
使用@Styles装饰器可以定义一些布局类的基础样式,比如背景,内外边距等等;如果定义在组件内部,有助于提升组件内聚;定义在外部,可以构建基础样式库。
而像fontSize、fontColor之类的仅在部分组件上具备的属性定义,在@Styles中无法使用。所以这里就需要用到@Extends装饰器。
Extend装饰器
import { CustomButton } from './CustomButton' @Extend(Text) function TextStyle() { .fontSize(50) .fontWeight(FontWeight.Bold) .id('HelloWorld') } @Entry @Component struct Index { @State message: string = 'Hello World'; @Styles HelloWorldStyle() { .backgroundColor(Color.Yellow) .border({ width: { bottom: 5 }, color: '#ccc' }) .margin({ bottom: 10 }) } build() { Flex({ direction: FlexDirection.Column, justifyContent: FlexAlign.Center, alignItems: ItemAlign.Center, }) { Text(this.message) .TextStyle() .HelloWorldStyle() CustomButton() } .height('100%') .width('100%') } }
此外@Extend还可以带参数:
@Extend(Text) function TextStyle(fontSize: number = 50, fontColor: ResourceStr | Color = '#f00') { .fontSize(fontSize) .fontColor(fontColor) .fontWeight(FontWeight.Bold) .id('HelloWorld') }
然后直接点调用
Text(this.message) .TextStyle(36, '#06c') .HelloWorldStyle()
我们就得到了:

@Extend装饰器不能装饰struct组件内部成员函数,这是与@Styles装饰器的一处不同。
事件回调
各种事件也都可以点出来:
import { promptAction } from '@kit.ArkUI' @Component export struct CustomButton { build() { Column() { Button('My Button') .onClick(() => { promptAction.showToast({ message: '你点我!' }) }) } } }
请注意这里使用了promptAction组件来实现toast效果:

事件回调的参数
对Web开发者来说,首先要注意的是:没有事件传递————没有冒泡或捕获过程,不需要处理子节点事件冒泡到父节点的问题。
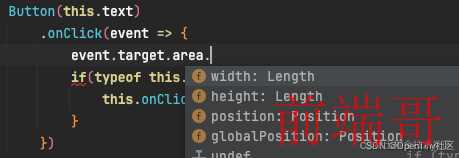
此外点击事件的回调参数提供了比较全面的详细信息UI信息,对实现一些弹框之类的UI展示比较有帮助。

比如event.target.area可以获取触发组件本身的布局信息:

自定义事件
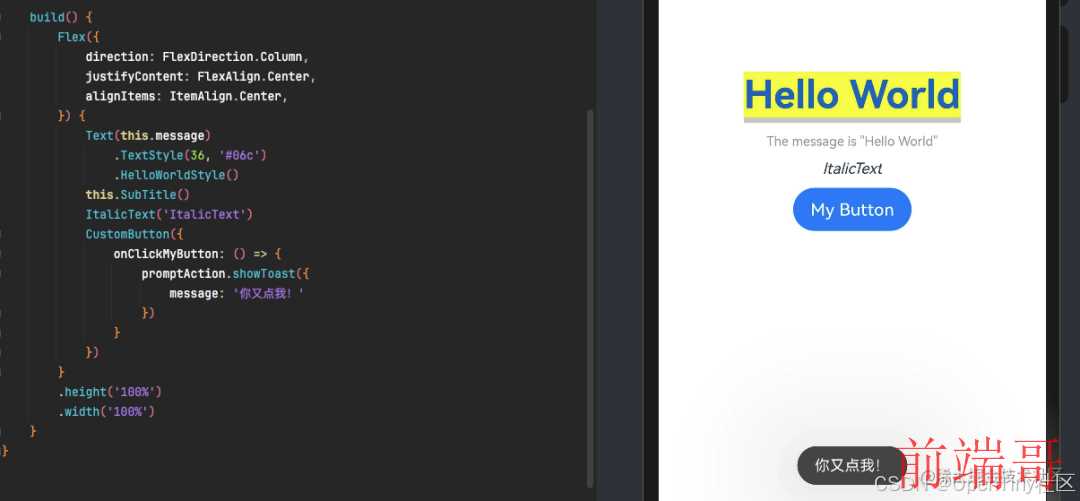
我们改一下上面的组件代码,在组件中声明一个成员函数onClickMyButton,作为Button点击的回调:
@Component export struct CustomButton { onClickMyButton?: () => void build() { Column() { Button('My Button') .onClick(() => { if(typeof this.onClickMyButton === 'function') { this.onClickMyButton() } }) } } }
然后改一下Index页面代码,定义onClickMyButton回调:
build() { Flex({ direction: FlexDirection.Column, justifyContent: FlexAlign.Center, alignItems: ItemAlign.Center, }) { // ... CustomButton({ onClickMyButton: () => { promptAction.showToast({ message: '你又点我!' }) } }) } .height('100%') .width('100%') }

属性与状态
在mv(x)架构下,数据模型(model)一般分为属性和状态两种概念,且都应当驱动视图(view)更新。
- 属性(
property),指外部(父级)传入值,自身只可读不可更改;如需要修改,则要通过回调通知父组件。 - 状态(
state),私有值,用于内部逻辑计算;一般来讲,状态的数据结构复杂度,与组件复杂度正相关。
在ArkTS中,组件(struct)成员有诸多修饰符可选。基于个人的开发经验和习惯,我推荐使用单向数据流方式,模型层面仅使用@Prop和@State来实现组件间交互。下面简单讲一下使用:
@State状态装饰器
在之前的代码中,可以看到一个用@State声明的状态值message。
被@State装饰的成员,可以对标react的useState成员,或者vue组件中data()的某一个key。
@Prop属性装饰器
被@State装饰的成员,可以对标react的useState成员,或者vue组件中data()的某一个key。
@Component export struct CustomButton { onClickMyButton?: () => void @Prop text: string = 'My Button' build() { Column() { Button(this.text) // 使用该属性 .onClick(() => { if(typeof this.onClickMyButton === 'function') { this.onClickMyButton() } }) } } }
在父级调用
CustomButton({ text: '我的按钮' })

状态和属性的更改
再完善一下组件:
@Component export struct CustomButton { onClickMyButton?: () => void @Prop text: string = 'My Button' @Prop count: number = 0 build() { Column() { // 这里展示计数 Button(`${this.text}(${this.count})`) .onClick(() => { if(typeof this.onClickMyButton === 'function') { this.onClickMyButton() } }) } } }
这里声明了两个属性text和count,以及一个自定义事件onClickMyButton。
父级声明一个状态clickCount,绑定子组件的count属性,并在子组件的自定义事件中,增加clickCount的值。预期页面的计数随clickCount变化,按钮组件的计数随属性count变化,两者应当同步。
@Entry @Component struct Index { @State message: string = 'Hello World'; @State clickCount: number = 0 @Styles HelloWorldStyle() { .backgroundColor(Color.Yellow) .border({ width: { bottom: 5 }, color: '#ccc' }) .margin({ bottom: 10 }) } @Builder SubTitle() { // 这里展示计数 Text(`The message is "${this.message}", count=${this.clickCount}`) .margin({ bottom: 10 }) .fontSize(12) .fontColor('#999') } build() { Flex({ direction: FlexDirection.Column, justifyContent: FlexAlign.Center, alignItems: ItemAlign.Center, }) { Text(this.message) .TextStyle(36, '#06c') .HelloWorldStyle2() this.SubTitle() ItalicText('ItalicText') CustomButton({ text: '点击次数', count: this.clickCount, onClickMyButton: () => { this.clickCount += 1 } }) } .height('100%') .width('100%') } }
实际效果:

符合预期。
属性监听
使用@Watch装饰器,可以监听@Prop装饰对象的变化,并能指定监听方法:
@Prop @Watch('onChange') count: number = 0 private onChange(propName: string) { console.log('>>>>>>', propName) }
@Watch装饰器调用onChange时,会把发生变化的属性名作为参数传递给onChange;也就是说,我们可以只定义一个监听方法,通过入参propName来区分如何操作。
@Prop @Watch('onChange') count: number = 0 @Prop @Watch('onChange') stock: number = 0 private onChange(propName: string) { if(propName === 'count') { //... } else if(propName === 'stock') { //... } }
我们下面用@Watch监听属性count,实现属性更改驱动组件内部状态变化。首先改造组件:
@Component export struct CustomButton { onClickMyButton?: () => void @Prop text: string = 'My Button' @Prop @Watch('onChange') count: number = 0 // 内部状态 @State private double: number = 0 private onChange() { this.double = this.count * 2 } build() { Column() { Button(`${this.text}(${this.count} x 2 = ${this.double})`) .onClick(() => { if(typeof this.onClickMyButton === 'function') { this.onClickMyButton() } }) } } }

效果可以对标react中的useEffect,或者vue中的observer或者watch。
这里有一个隐含的问题:当@Prop被第一次赋值的时候,不会触发@Watch监听器。比如我们把页面状态clickCount初始化为3,这时候尬住了:

在web的解决方案中,这种问题自然是绑定组件生命周期。同样,ArtTS也是如此:
@Component export struct CustomButton { onClickMyButton?: () => void @Prop text: string = 'My Button' @Prop @Watch('onChange') count: number = 0 @State private double: number = 0 private onChange() { this.double = this.count * 2 } build() { Column() { Button(`${this.text}(${this.count} x 2 = ${this.double})`) .onClick(() => { if(typeof this.onClickMyButton === 'function') { this.onClickMyButton() } }) } // 这里绑定生命周期 .onAttach(() => { this.onChange() }) } }
本文为了简便,直接在onAttach中使用监听函数初始化。具体情况请自行斟酌。

条件渲染
用过react的人都知道三目表达式的痛:
// 以下伪代码 未验证 export default MyPage = (props: { hasLogin: boolean; userInfo: TUserInfo }) => { const { hasLogin, userInfo } = props return <div className='my-wrapper'>{ hasLogin ? <UserInfo info={userInfo} /> : <Login /> }</div> }
前面提过,由于return后面词法限制,只能使用纯表达式写法。或者,把return包裹到if..else中,总归不是那么优雅。
ArkTS则直接支持在build()中使用if...else分支写法:
build() { Column() { Button(`${this.text}(${this.count} x 2 = ${this.double})`) .onClick(() => { if(typeof this.onClickMyButton === 'function') { this.onClickMyButton() } }) if(this.count % 2 === 0) { Text('双数').fontColor(Color.Red).margin({ top: 10 }) } else { Text('单数').fontColor(Color.Blue).margin({ top: 10 }) } } .onAttach(() => { this.onChange() }) }

函数式组件
这里的函数式的命名,是纯字面的,并不是react的Functional Component的意思。
这类组件由@Builder装饰器声明,对象可以是一个单独的function,抑或是struct组件中的一个方法。
需要特别注意的是,这里的function是指通过function声明的函数,不包括**箭头函数(Arrow Function) **。
import { CustomButton } from './CustomButton' @Extend(Text) function TextStyle(fontSize: number = 50, fontColor: ResourceStr | Color = '#f00') { .fontSize(fontSize) .fontColor(fontColor) .fontWeight(FontWeight.Bold) .id('HelloWorld') } @Builder function ItalicText(content: string) { Text(content).fontSize(14).fontStyle(FontStyle.Italic).margin({ bottom: 10 }) } @Entry @Component struct Index { @State message: string = 'Hello World'; @Styles HelloWorldStyle() { .backgroundColor(Color.Yellow) .border({ width: { bottom: 5 }, color: '#ccc' }) .margin({ bottom: 10 }) } @Builder SubTitle() { Text(`The message is "${this.message}"`) .margin({ bottom: 10 }) .fontSize(12) .fontColor('#999') } build() { Flex({ direction: FlexDirection.Column, justifyContent: FlexAlign.Center, alignItems: ItemAlign.Center, }) { Text(this.message) .TextStyle(36, '#06c') .HelloWorldStyle() this.SubTitle() ItalicText('ItalicText') CustomButton() } .height('100%') .width('100%') } }
上面的代码中,声明了一个外部组件ItalicText,一个内部组件this.SubTitle,可以在build()中直接使用。

由于@Builder的装饰对象是一个function函数,所以这个组件可以带参数动态渲染。
实现插槽
ArkTS中提供了@BuilderParam装饰器,可以让@Builder以参数的形式向其他组件传递。这为实现插槽提供了条件。
我们首先在组件中声明一个@BuilderParam,然后植入到组件的build()中。改造组件代码:
@Component export struct CustomButton { onClickMyButton?: () => void @Prop text: string = 'My Button' @Prop @Watch('onChange') count: number = 0 @State private double: number = 0 // 插槽 @BuilderParam slot: () => void private onChange() { this.double = this.count * 2 } build() { Column() { Button(`${this.text}(${this.count} x 2 = ${this.double})`) .onClick(() => { if(typeof this.onClickMyButton === 'function') { this.onClickMyButton() } }) if(this.count % 2 === 0) { Text('双数').fontColor(Color.Red).margin({ top: 10 }) } else { Text('单数').fontColor(Color.Blue).margin({ top: 10 }) } // 植入插槽,位置自定 if(typeof this.slot === 'function') { this.slot() } } .onAttach(() => { this.onChange() }) } }
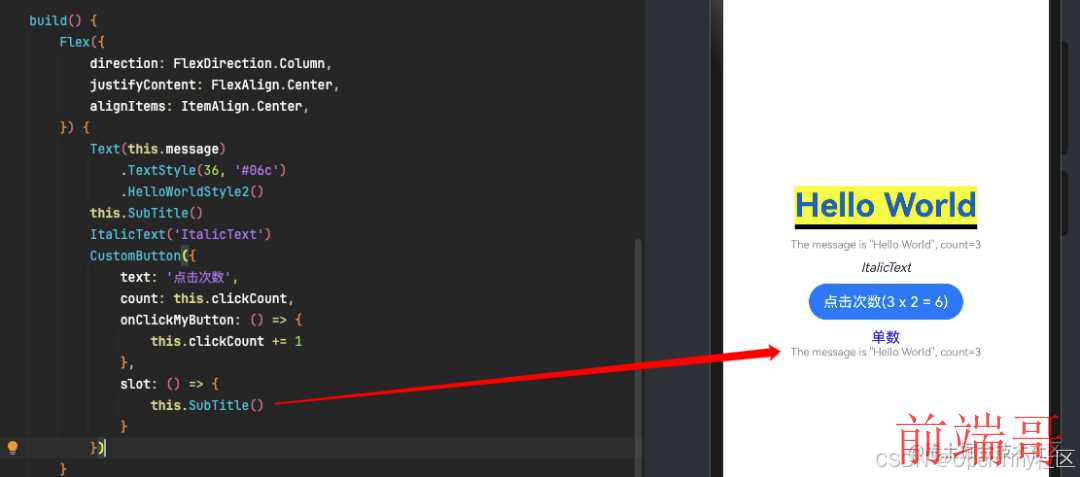
页面代码更改:
build() { Flex({ direction: FlexDirection.Column, justifyContent: FlexAlign.Center, alignItems: ItemAlign.Center, }) { Text(this.message) .TextStyle(36, '#06c') .HelloWorldStyle2() this.SubTitle() ItalicText('ItalicText') CustomButton({ text: '点击次数', count: this.clickCount, onClickMyButton: () => { this.clickCount += 1 }, // 定义插槽 slot: () => { this.SubTitle() } }) } .height('100%') .width('100%') }

这种单一插槽的情况,可以有更优雅的写法:

请注意:单一插槽,也就是说组件中仅包含一个@BuilderParam成员,且与成员命名无关。
如果有多个@BuilderParam成员,下面那种嵌套写法会在编译期报错:
[Compile Result] In the trailing lambda case, 'CustomButton' must have one and only one property decorated with @BuilderParam, and its @BuilderParam expects no parameter.
这错误提示给出两点要求:
- 仅有一个
@BuilderParam装饰成员 - 该成员函数不能有参数
看一个多插槽的例子,继续优化组件:
@Component export struct CustomButton { onClickMyButton?: () => void @Prop text: string = 'My Button' @Prop @Watch('onChange') count: number = 0 @State private double: number = 0 @BuilderParam slot: () => void @BuilderParam slot2: () => void private onChange() { this.double = this.count * 2 } build() { Column() { Button(`${this.text}(${this.count} x 2 = ${this.double})`) .onClick(() => { if(typeof this.onClickMyButton === 'function') { this.onClickMyButton() } }) if(typeof this.slot === 'function') { this.slot() } if(this.count % 2 === 0) { Text('双数').fontColor(Color.Red).margin({ top: 10 }) } else { Text('单数').fontColor(Color.Blue).margin({ top: 10 }) } if(typeof this.slot2 === 'function') { this.slot2() } } .onAttach(() => { this.onChange() }) } }

请注意:在向@BuilderParam插槽传入@Builder的时候,一定包一层箭头函数,否则会引起this指向问题。
写在最后
从个人感受来讲,如果一个开发者对TS有充分的使用经验,进入ArkTS之后,只要对ArkTS的方言、开发模式和基础库做简单了解,基本就能上手开发了,总体门槛不高。
最后吐几个槽点:
- 语法方面:虽然叫
ts,但ts的类型推断几乎没有;没有type类型声明;不能一次性声明嵌套的复杂类型;没有any/unkown类型,Object有点类似unknown,仅此而已;不支持解构取值。 - 文档系统不完善,使用不方便,检索困难。
- 开发工具在模拟器或者真机下没有热更,每次更改都要重新编译,效率不高。
不过,上面的槽点只是有点烦,习惯就好。
关于 OpenTiny

OpenTiny 是一套企业级 Web 前端开发解决方案,提供跨端、跨框架、跨版本的 TinyVue 组件库,包含基于 Angular+TypeScript 的 TinyNG 组件库,拥有灵活扩展的低代码引擎 TinyEngine,具备主题配置系统TinyTheme / 中后台模板 TinyPro/ TinyCLI 命令行等丰富的效率提升工具,可帮助开发者高效开发 Web 应用。
欢迎加入 OpenTiny 开源社区。添加微信小助手:opentiny-official 一起参与交流前端技术~
OpenTiny 官网:https://opentiny.design/
OpenTiny 代码仓库:https://github.com/opentiny/
TinyVue 源码:https://github.com/opentiny/tiny-vue
TinyEngine 源码: https://github.com/opentiny/tiny-engine
欢迎进入代码仓库 Star🌟TinyEngine、TinyVue、TinyNG、TinyCLI~ 如果你也想要共建,可以进入代码仓库,找到 good first issue标签,一起参与开源贡献~

