Vite前端开发与构建工具
开发环境中,vite无需打包,可快速的冷启动
真正的按需编译,不需要等待整个应用编译完成
一个开发服务器,它基于原生ES模块 提供了丰富的内建功能,速度快模块热更新(HMR)
一套构建指令,它使用Rollup打包代码,并且它是预配置的,可输出用于生产环境的高度优化过的静态资源。
Vue3 与 Vue2区别
Vue2 使用 Options API 而 Vue3 使用的 Composition API
TypeScript
在应用中对类型判断的定义和使用有很强的表现。同一对象的多个键返回值必须通过定义对应的接口(interface)来进行类型定义。要不然在 ESLint 时都会报错
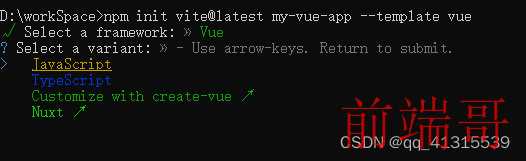
使用Vite创建脚手架
注意:Vite 需要 Node.js 版本 >= 12.0.0
1、创建项目文件夹,例如:想在workSpace文件下创建 my-vue-app,则先进入workplace文件夹,再打开cmd,运行一下命令
| # npm 6.x |
| npm init vite@latest my-vue-app --template vue |
| |
| # npm 7+, 需要额外的双横线: |
| npm init vite@latest my-vue-app -- --template vue |
2、选择Vue
3、选择TypeScript
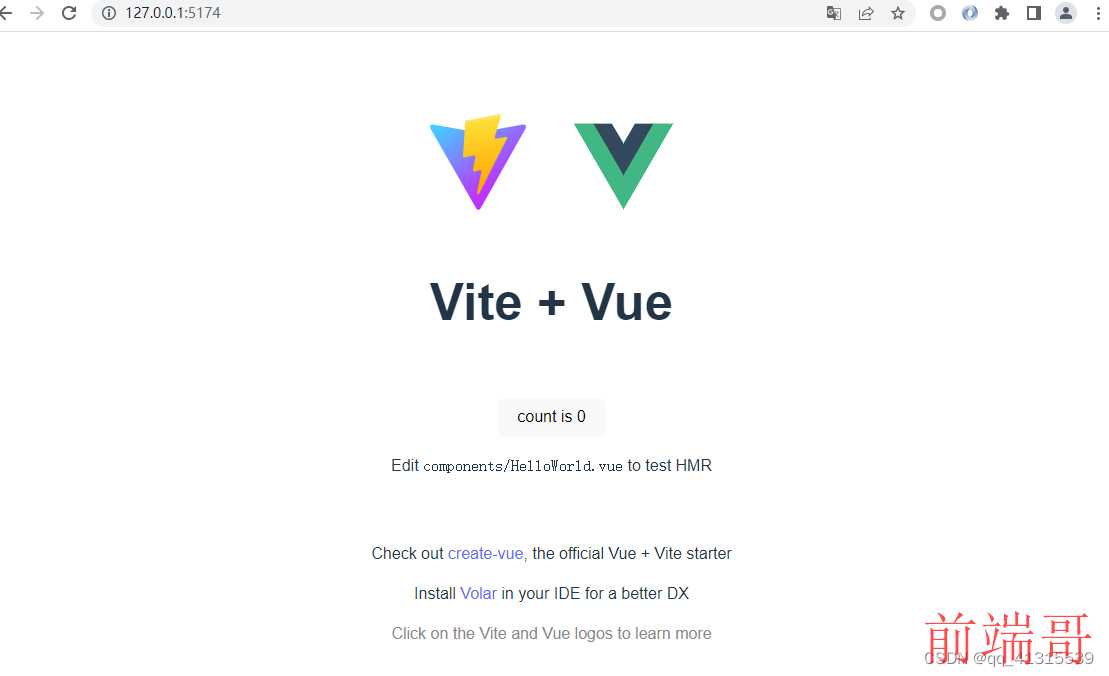
4、完成后可以看到项目文件夹(my-vue-app),然后根据指令,进入文件夹,安装依赖,运行项目


完成后效果
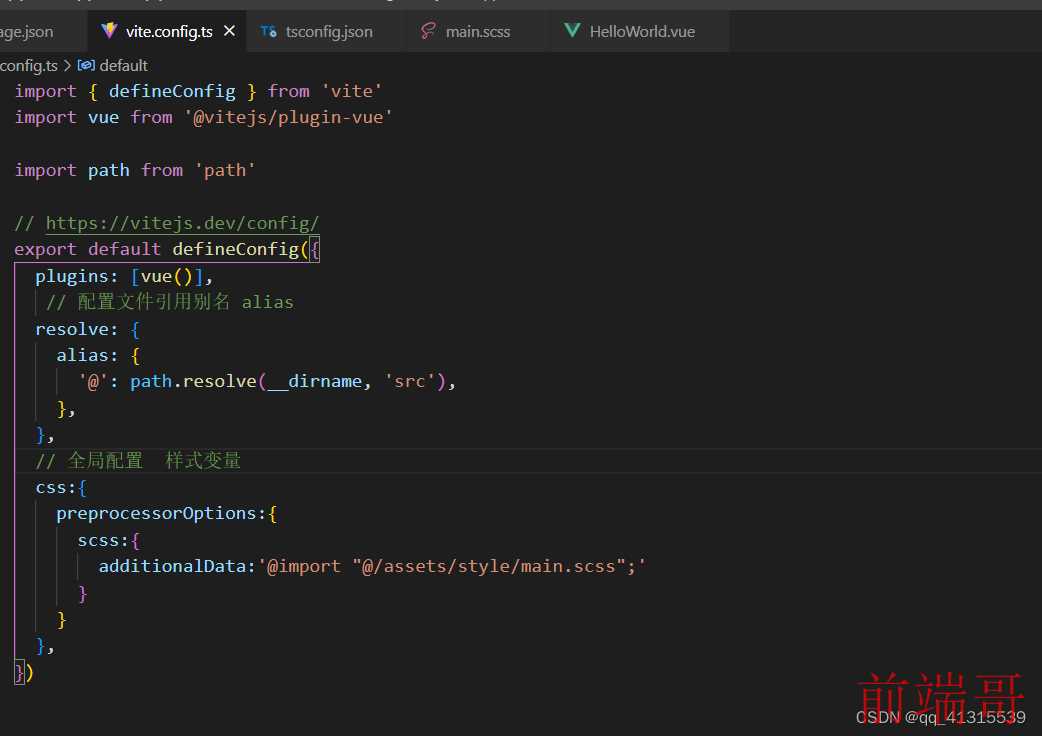
配置文件引用别名 alias
修改 vite.config.ts 文件配置(此时:会报错 path 未定义,接下来定义path)
| import { defineConfig } from 'vite' |
| import vue from '@vitejs/plugin-vue' |
| |
| import path from 'path' |
| |
| |
| export default defineConfig({ |
| plugins: [vue()], |
| |
| resolve: { |
| alias: { |
| '@': path.resolve(__dirname, 'src'), |
| }, |
| }, |
| }) |
定义path,修改tsconfig.json
| { |
| "compilerOptions": { |
| "target": "ESNext", |
| "useDefineForClassFields": true, |
| "module": "ESNext", |
| "moduleResolution": "Node", |
| "strict": true, |
| "jsx": "preserve", |
| "resolveJsonModule": true, |
| "isolatedModules": true, |
| "esModuleInterop": true, |
| "lib": ["ESNext", "DOM"], |
| "skipLibCheck": true, |
| "noEmit": true, |
| "baseUrl": ".", |
| "paths": { |
| "@/*":["src/*"] |
| } |
| }, |
| "include": ["src/**/*.ts", "src/**/*.d.ts", "src/**/*.tsx", "src/**/*.vue"], |
| "references": [{ "path": "./tsconfig.node.json" }] |
| } |
安装css处理器插件scss
| npm install sass-loader sass webpack --save-dev |
| 或yarn add sass-loader --dev |
| |
| npm i dart-sass |
| 或yarn add dart-sass --dev |
| |
| npm i npm-sass |
| 或yarn add sass --dev |
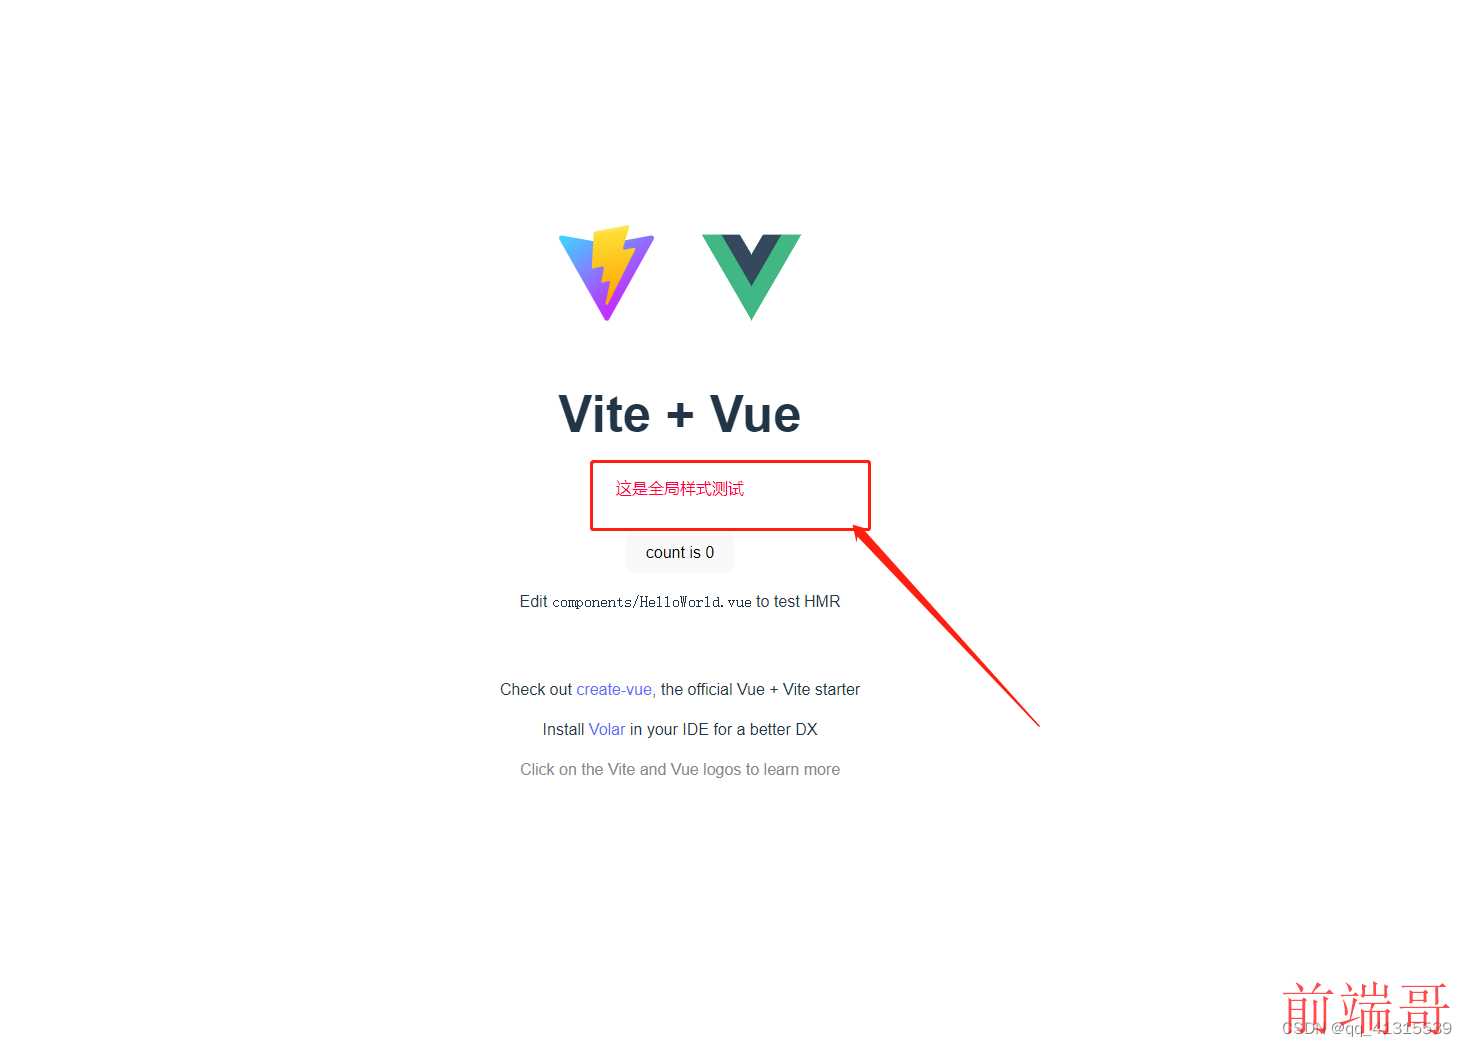
配置全局scss样式(在src/assets 下创建style 文件夹,用于存放全局样式文件,创建main.scss文件,用于测试)
| $test-color: rgb(255, 0, 60); |
在组件 HelloWorld.vue文件中 添加测试元素与绑定测试样式
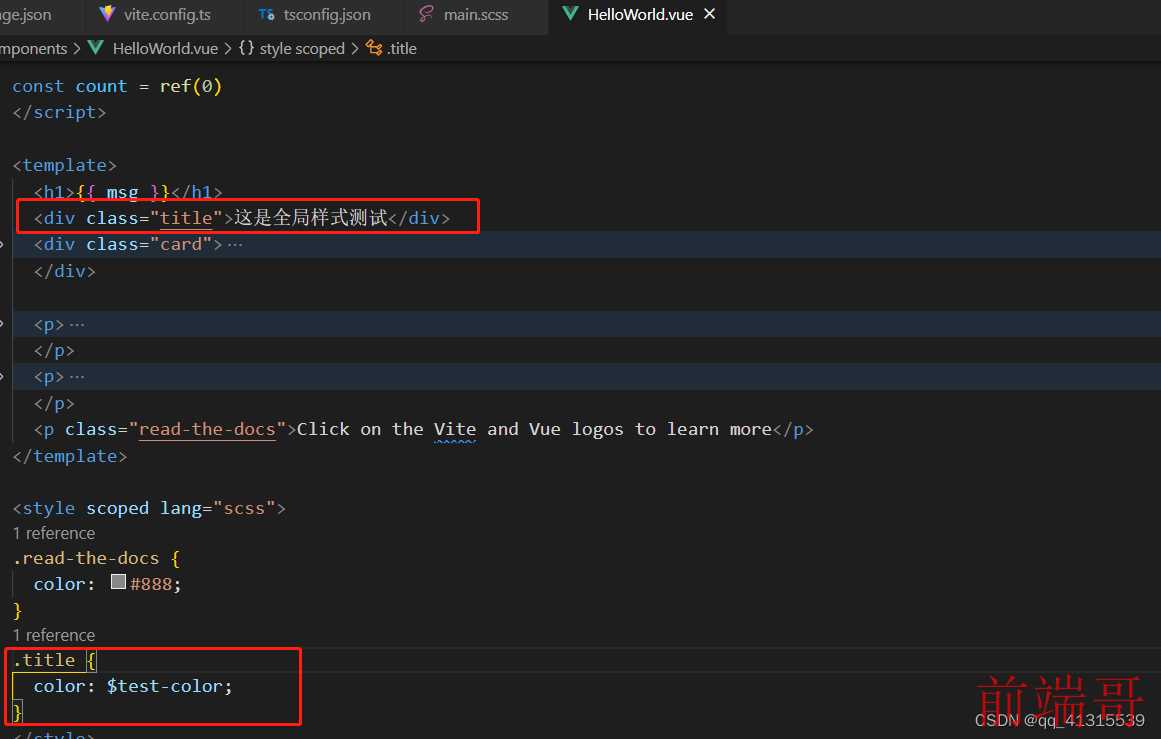
仅仅这样会编译报错,还需要在vite.config.ts 中增加 全局样式配置
| |
| css:{ |
| preprocessorOptions:{ |
| scss:{ |
| additionalData:'@import "@/assets/style/main.scss";' |
| } |
| } |
| }, |
完整配置如下图
效果图片
安装路由 vue-router
| npm i vue-router |
| |
| yarn add vue-router@4 |
在src 文件夹下 创建 router 文件夹 -》并新建router.ts 文件,文件内容如下
| import { createRouter, createWebHistory, RouteRecordRaw } from 'vue-router'; |
| |
| const routes: RouteRecordRaw[] = [ |
| { |
| path: '/home', |
| name: 'home', |
| component: () => import('@/views/Home/index.vue'), |
| }, |
| { |
| path: '/', |
| name: 'helloWorld', |
| component: () => import('@/components/HelloWorld.vue'), |
| }, |
| { |
| path: '/helloWorld', |
| name: 'helloWorld', |
| component: () => import('@/components/HelloWorld.vue'), |
| }, |
| ]; |
| |
| |
| const router = createRouter({ |
| history: createWebHistory(), |
| routes, |
| }); |
| |
| export default router; |
新建页面:在src 文件夹下创建 views文件夹-》创建 home 文件夹-》创建 index.vue 文件,文件内容如下
| <template> |
| <h1>这是 home 页</h1> |
| |
| <router-link :to="{path:'/helloWorld'}">跳转到helloWord(router-link)</router-link> |
| <br/> |
| <button @click="goHelloWordPage">跳转到 helloWord(js_function)</button> |
| </template> |
| |
| |
| <script setup lang="ts"> |
| import {useRouter} from 'vue-router' |
| |
| |
| const $r = useRouter(); |
| |
| const goHelloWordPage = () =>{ |
| $r.push("helloWorld") |
| } |
| |
| </script> |
在入口文件main.ts 中 配置路由
| import { createApp } from 'vue' |
| import './style.css' |
| import App from './App.vue' |
| |
| import router from '@/router/router' |
| |
| const app = createApp(App) |
| |
| app.use(router) |
| app.mount('#app') |
| |
| |
注意:配置完成后发现 浏览器地址栏:http://127.0.0.1:5174/home 无法跳转,需要在App.vue中配置路由容器,原有的template 替换为 一下内容
| <template> |
| |
| <router-view></router-view> |
| |
| </template> |
状态管理 Pinia
安装
| npm i pinia |
| |
| yarn add pinia@next |
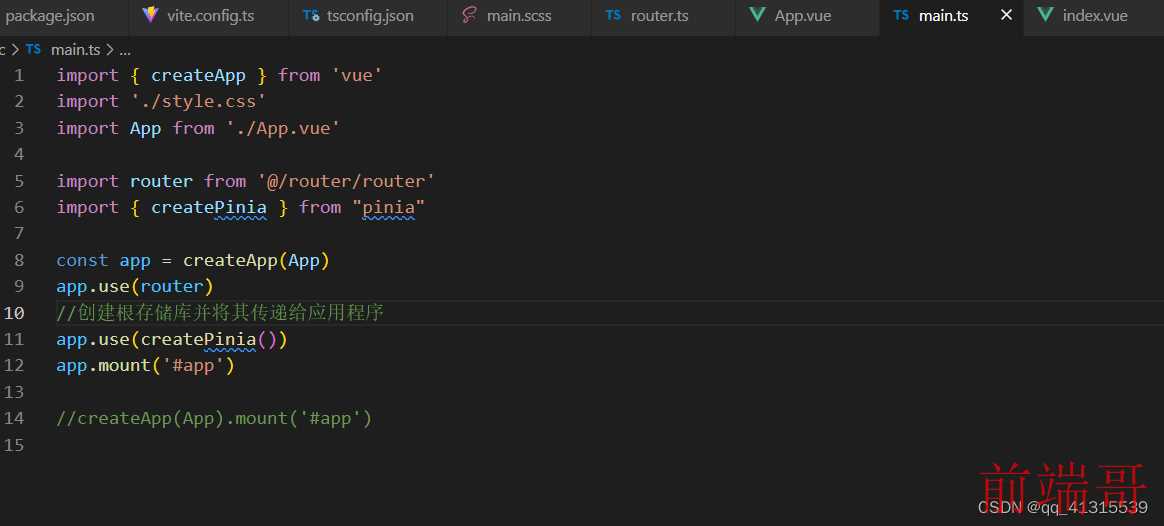
在main.ts 中注册 pinia
| |
| import { createPinia } from "pinia" |
| |
| # 创建根存储库并将其传递给应用程序 |
| app.use(createPinia()) |
定义状态:在src文件夹下 创建store文件夹-》创建main.ts文件,文件内容如下
| import { defineStore } from 'pinia' |
| |
| export const useMainStore = defineStore({ |
| id: 'main', |
| state: () =>({ |
| name: '群主' |
| }), |
| getters: { |
| nameLength: (state) => state.name.length, |
| } |
| }) |
组件中使用与修改:
| <template> |
| <div>这是状态管理Pinia:{{ mainStore.name }}<br />长度:{{ mainStore.nameLength }}</div> |
| <button @click="updateName">修改 store 中的 name</button> |
| </template> |
| |
| <script setup lang="ts"> |
| |
| import { useMainStore } from "@/store/main"; |
| |
| const mainStore = useMainStore() |
| const updateName = () => { |
| |
| mainStore.$patch({ |
| name: "名称被修改了,nameLength也随之改变了", |
| }); |
| }; |
| |
| </script> |
| |
例如在 home->index.vue 中使用
| <template> |
| <h1>这是 home 页</h1> |
| <router-link :to="{path:'/helloWorld'}">跳转到helloWord(router-link)</router-link> |
| <br/> |
| <button @click="goHelloWordPage">跳转到 helloWord(js_function)</button> |
| <br/> |
| <div>这是状态管理Pinia:{{ mainStore.name }}<br />长度:{{ mainStore.nameLength }}</div> |
| <button @click="updateName">修改 store 中的 name</button> |
| </template> |
| |
| |
| <script setup lang="ts"> |
| import {useRouter} from 'vue-router' |
| import { useMainStore } from "@/store/main"; |
| |
| const mainStore = useMainStore() |
| const updateName = () => { |
| |
| mainStore.$patch({ |
| name: "名称被修改了,nameLength也随之改变了", |
| }); |
| }; |
| |
| |
| const $r = useRouter(); |
| |
| const goHelloWordPage = () =>{ |
| $r.push("helloWorld") |
| } |
| |
| </script> |
环境变量配置
vite提供了开发模式(development)和生产模式(product)
项目根目录创建开发环境 .enc.dev 文件,文件内容如下
| NODE_ENV=development |
| VITE_APP_WEB_URL= 'https://www.baidu.com' |
项目根目录创建生产环境 .enc.prod 文件,文件内容如下
| NODE_ENV=production |
| VITE_APP_WEB_URL='https://www.goole.com' |
使用:在views->home->index.vue 中 添加
| <template> |
| <p>当前环境:{{ env.NODE_ENV }}</p> |
| </template> |
| |
| |
| <script setup lang="ts"> |
| const env = import.meta.env |
| </script> |
最后修改 pacakge.json 生效
| "scripts": { |
| "dev": "vite --mode dev", |
| "dev:prod": "vite --mode prod", |
| "build": "vue-tsc && vite build", |
| "build:dev": "vue-tsc --noEmit && vite build --mode dev", |
| "build:uat": "vue-tsc --noEmit && vite build --mode uat", |
| "build:prod": "vue-tsc --noEmit && vite build --mode prod", |
| "preview": "vite preview" |
| }, |
启动项目时:
npm run dev
npm run dev:prod
不同的启动方式,环境变量值不同


