前言:vue3+typescript+pinia学习
文章目录
- 一、vue3
- 1.组合式API
- 2.setup函数
- 3.reactive函数
- 4.ref函数
- 5.reactive 与 ref 的选择
- 6.setup语法糖
- 6.1.vue3+vite自动导入ref等组合式API插件 `unplugin-auto-import`
- 7.computed函数
- 7.watch函数
- 8.生命周期函数
- 9.ref获取DOM元素
- 10.ref操作组件-defineExpose
- 11.父传子defineProps函数
- 12.子传父-defineEmits函数
- 13.跨级组件通讯provide与inject函数
- 14.保持响应式-toRefs函数
- 15.综合案例
- 二、Typescript
- 1.Typescript起步
- 1.1 Typescript介绍
- 1.2 TypeScript 编译
- 2.TypeScript 核心
- 2.1 原始类型
- 2.2 数组类型
- 2.3 联合类型
- 2.4 类型别名
- 2.5 函数类型
- 2.5.1 基本使用
- 2.5.2 void 类型
- 2.5.3 可选参数
- 2.6 对象类型
-
- 2.7 接口 interface
- 2.7.1 interface 继承
- 2.7.2 type 交叉类型
- 2.7.3 interface 和 type 的相同点和区别
- 2.8 类型推断
- 2.9 字面量类型
- 2.9.1 字面量类型介绍
- 2.9.2 字面量类型应用
- 2.10 any 类型
- 2.11 类型断言
- 2.11 泛型
- 2.11.1 泛型别名
- 2.11.2 泛型接口
- 2.11.3 泛型函数
- 3.TypeScript 应用
- 3.1TypeScript与Vue
- 3.1.1 defineProps的TS写法
- 3.1.2 defineEmits的TS写法
- 3.1.3 ref的TS写法
- 3.1.4 reactive的TS写法
- 3.1.5 computed和TS
- 3.1.6 事件处理与TS
- 3.1.7 Template Ref与TS
- 3.1.8 非空断言
- 3.2 TypeScript类型声明文件
- 3.2.1 基本介绍
- 3.2.2 内置类型声明文件
- 3.2.3 第三方库类型声明文件
- 3.2.4 自定义类型声明文件
-
- 4.TypeScript 案例(头条)
- 5. TS在vue3中使用总结
- 三、Pinia
- 3.1 Pinia介绍
- 3.2 Pinia使用步骤(以vue3为例)
- 3.3 storeToRefs的使用
- 3.4 用Pinia改造头条
一、vue3
1.组合式API
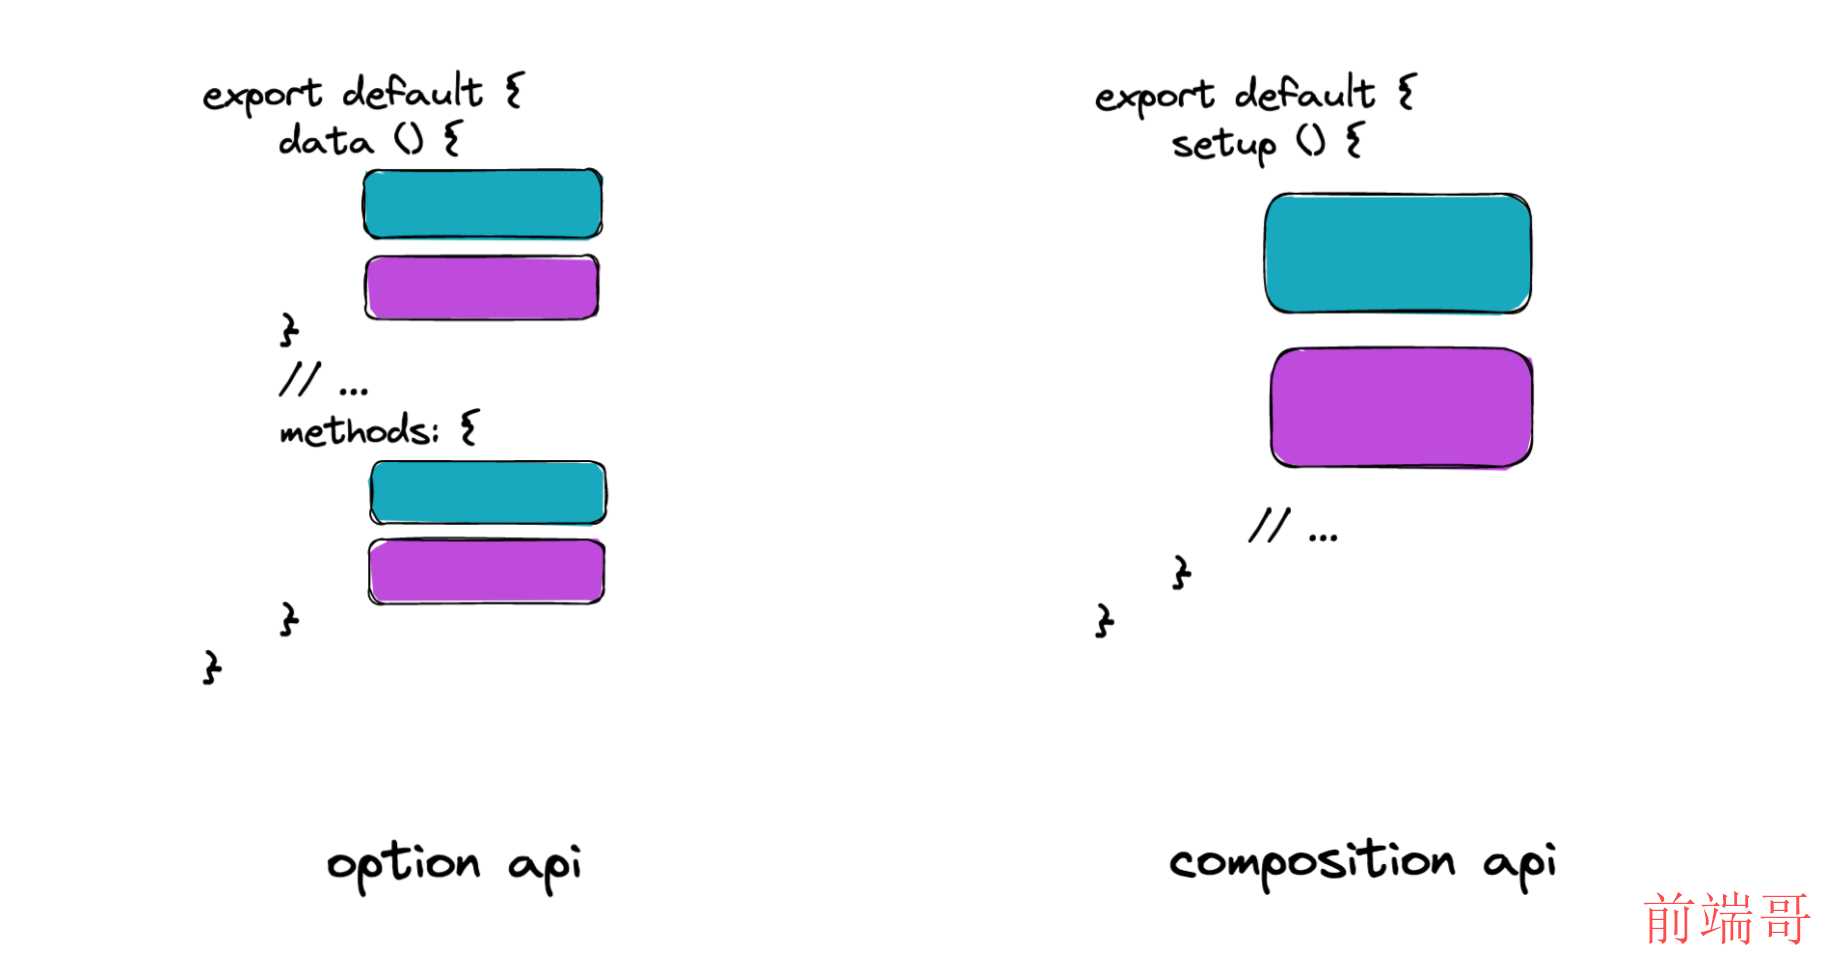
介绍:什么是组合式API,组合式API的特点
Vue3提供两种组织代码逻辑的写法:
- 通过data、methods、watch 等配置选项组织代码逻辑是选项式API写法
- 所有逻辑在setup函数中,使用 ref、watch 等函数组织代码是组合式API写法
| |
| <template> |
| <button @click="toggle">显示隐藏图片</button> |
| <img v-show="show" alt="Vue logo" src="./assets/logo.png" /> |
| <hr /> |
| 计数器:{{ count }} <button @click="increment">累加</button> |
| </template> |
| <script> |
| export default { |
| data() { |
| return { |
| show: true, |
| count: 0, |
| }; |
| }, |
| methods: { |
| toggle() { |
| this.show = !this.show; |
| }, |
| increment() { |
| this.count++; |
| }, |
| }, |
| }; |
| </script> |
| |
| <template> |
| <button @click="toggle">显示隐藏图片</button> |
| <img v-show="show" alt="Vue logo" src="./assets/logo.png" /> |
| <hr /> |
| 计数器:{{ count }} <button @click="increment">累加</button> |
| </template> |
| <script> |
| |
| import { ref } from 'vue'; |
| export default { |
| setup () { |
| |
| const show = ref(true) |
| const toggle = () => { |
| show.value = !show.value |
| } |
| |
| const count = ref(0) |
| const increment = () => { |
| count.value ++ |
| } |
| |
| return { show, toggle, count, increment } |
| } |
| }; |
| </script> |
总结:
- 在setup中通过vue提供的函数组织代码实现功能,就是组合式API写法。
- 组合式API有什么好处? 可复用,可维护
- ref 是不是一个组合式API? 是
2.setup函数
概念:
setup函数是组合式API的入口函数setup 函数是 Vue3 特有的选项,作为组合式API的起点- 从组件生命周期看,它在
beforeCreate 之前执行 - 函数中
this 不是组件实例,是 undefined(今后在vue3的项目中几乎用不到 this , 所有的东西通过函数获取) - 如果数据或者函数在模板中使用,需要在
setup 返回
3.reactive函数
通常使用它定义对象类型的响应式数据
原因:以前在 data 函数中返回对象数据就是响应式的,而现在 setup 中返回对象数据不是响应式的
| <template> |
| <div> |
| <p>姓名:{{state.name}}</p> |
| <p>年龄:{{state.age}} <button @click="state.age++">一年又一年</button></p> |
| </div> |
| </template> |
| |
| <script> |
| |
| import { reactive } from "vue"; |
| export default { |
| setup() { |
| |
| const state = reactive({ name: 'tom', age: 18 }) |
| |
| return { state } |
| } |
| }; |
| </script> |
4.ref函数
通常使用它定义响应式数据,不限类型
注意:使用 ref 创建的数据,js中需要 .value,template 中可省略
| <template> |
| <div> |
| <p> |
| 计数器:{{ count }} |
| <button @click="count++">累加1</button> |
| |
| <button @click="increment">累加10</button> |
| </p> |
| </div> |
| </template> |
| |
| <script> |
| |
| import { ref } from "vue"; |
| export default { |
| setup() { |
| |
| const count = ref(0); |
| const increment = () => { |
| |
| count.value += 10; |
| }; |
| |
| return { count, increment }; |
| }, |
| }; |
| </script> |
5.reactive 与 ref 的选择
reactive 可以转换对象成为响应式数据对象,但是不支持简单数据类型。ref 可以转换简单数据类型为响应式数据对象,也支持复杂数据类型,但是操作的时候需要 .value 。- 它们各有特点,现在也没有最佳实践,没有明显的界限,所有大家可以自由选择。
- 推荐用法:如果能确定数据是对象且字段名称也确定,可使用
reactive 转成响应式数据,这样可以省去.value其他一概使用 ref 。
6.setup语法糖
作用:简化 setup 固定套路代码 ,让代码更简洁
使用 setup 有几件事必须做:
- 默认导出配置选项
- setup函数声明
- 返回模板需要数据与函数
| |
| <script> |
| export default { |
| setup() { |
| const say = () => console.log('hi') |
| return { say } |
| } |
| } |
| </script> |
| |
| |
| <script setup> |
| const say = () => console.log('hi') |
| </script> |
| |
| <script setup> |
| |
| const show = ref(true) |
| const toggle = () => { |
| show.value = !show.value |
| } |
| |
| const count = ref(0) |
| const increment = () => { |
| count.value ++ |
| } |
| </script> |
| |
| <template> |
| <button @click="toggle">显示隐藏图片</button> |
| <img v-show="show" alt="Vue logo" src="./assets/logo.png" /> |
| <hr /> |
| 计数器:{{ count }} <button @click="increment">累加</button> |
| </template> |
6.1.vue3+vite自动导入ref等组合式API插件 unplugin-auto-import
使用方法:
- 安装:npm install -D
unplugin-auto-import - 在vite.config.ts中配置
| |
| import AutoImport from "unplugin-auto-import/vite" |
| export default defineConfig({ |
| plugins: [ |
| vue(), |
| |
| AutoImport({ |
| imports: ['vue'], |
| dts: 'src/auto-import.d.ts' |
| }), |
| ] |
| }) |
7.computed函数
使用场景:当需要依赖一个数据得到新的数据,就使用计算属性
| <script setup> |
| const list = ref([80,100,90,70,60]) |
| const betterList = computed(()=>list.value.filter((item)=>item>=90)) |
| setTimeout(()=>{ |
| list.value.push(92,66) |
| },2000) |
| </script> |
| |
| <template> |
| <div> |
| <p>分数{{list}}</p> |
| <p>优秀{{betterList}}</p> |
| </div> |
| </template> |
7.watch函数
使用watch函数监听数据的变化
大致内容:
| watch([数据1, 数据2, ...], 改变后回调函数) |
- 使用 watch 监听响应式对象数据中的一个属性(简单)
- 使用 watch 监听响应式对象数据中的一个属性(复杂),配置深度监听
| watch(()=>数据, 改变后回调函数, {deep: true}) |
案例
| |
| <script setup> |
| const count = ref(0) |
| watch(count,()=>{ |
| console.log('count改变了'); |
| }) |
| setTimeout(()=>{ |
| count.value++ |
| },2000) |
| </script> |
| |
| <template> |
| <p>计数器:{{count}}</p> |
| </template> |
| |
| <script setup> |
| const count = ref(0) |
| const user = reactive({ |
| name: "tom", |
| info: { |
| gender: "男", |
| age: 18, |
| }, |
| }); |
| |
| |
| watch([count, user], () => { |
| console.log("数据改变了"); |
| }); |
| |
| |
| setTimeout(() => { |
| count.value++; |
| }, 2000); |
| |
| |
| setTimeout(() => { |
| user.info.age++; |
| }, 4000); |
| </script> |
| |
| <template> |
| <p>计数器:{{count}}</p> |
| <p> |
| 姓名:{{ user.name }} 性别:{{ user.info.gender }} 年龄:{{ user.info.age }} |
| </p> |
| </template> |
| |
| <script setup> |
| const user = reactive({ |
| name: "tom", |
| info: { |
| gender: "男", |
| age: 18, |
| }, |
| }); |
| |
| |
| watch(() => user.name, () => { |
| console.log("数据改变了"); |
| }); |
| |
| setTimeout(() => { |
| user.name = 'jack'; |
| }, 2000); |
| </script> |
| |
| <template> |
| <p> |
| 姓名:{{ user.name }} 性别:{{ user.info.gender }} 年龄:{{ user.info.age }} |
| </p> |
| </template> |
| |
| <script setup> |
| const user = reactive({ |
| name: "tom", |
| info: { |
| gender: "男", |
| age: 18, |
| }, |
| }); |
| |
| |
| watch(() => user.info,() => { |
| console.log("数据改变了"); |
| }, |
| { |
| |
| deep: true, |
| } |
| ); |
| |
| setTimeout(() => { |
| user.info.age = 60; |
| }, 2000); |
| </script> |
| |
| <template> |
| <p> |
| 姓名:{{ user.name }} 性别:{{ user.info.gender }} 年龄:{{ user.info.age }} |
| </p> |
| </template> |
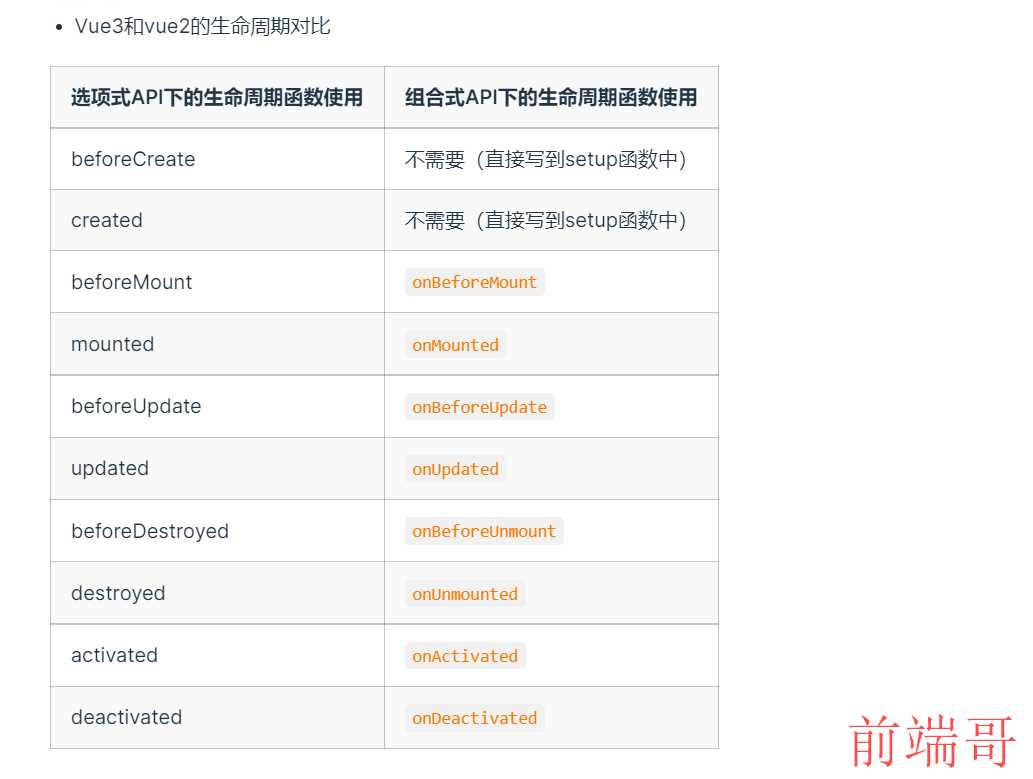
8.生命周期函数
常用: onMounted 组件渲染完毕:发请求,操作dom,初始化图表…
| <script setup> |
| |
| |
| onMounted(()=>{ |
| console.log('onMounted触发了') |
| }) |
| onMounted(()=>{ |
| console.log('onMounted也触发了') |
| }) |
| </script> |
| |
| <template> |
| <div>生命周期函数</div> |
| </template> |
9.ref获取DOM元素
元素上使用 ref 属性关联响应式数据,获取DOM元素
步骤:
- 创建 ref
const hRef = ref(null) - 模板中建立关联
<h1 ref="hRef">我是标题</h1> - 使用
hRef.value
| <script setup> |
| |
| const hRef = ref(null) |
| |
| const clickFn = () => hRef.value.innerText = '我不是标题' |
| </script> |
| |
| <template> |
| <div> |
| // 2.在模板中关联ref |
| <h1 ref="hRef">我是标题</h1> |
| <button @click="clickFn">操作DOM</button> |
| </div> |
| </template> |
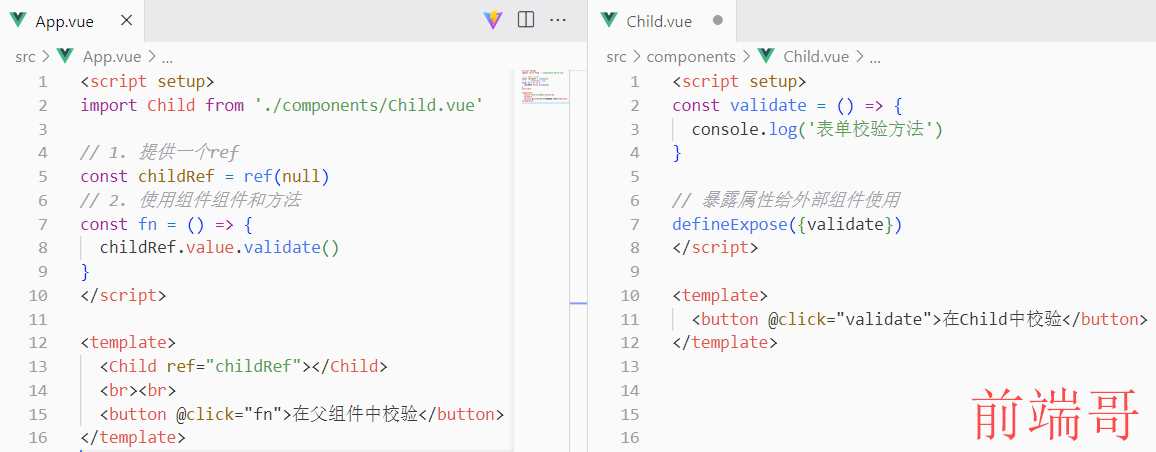
10.ref操作组件-defineExpose
组件上使用 ref 属性关联响应式数据,获取组件实例
配合 defineExpose 暴露数据和方法,ref获取的组件实例才可以使用
- 使用
<script setup> 的组件是默认关闭的,组件实例使用不到顶层的数据和函数。 - 需要配合
defineExpose 暴露给组件实例使用,暴露的响应式数据会自动解除响应式。
11.父传子defineProps函数
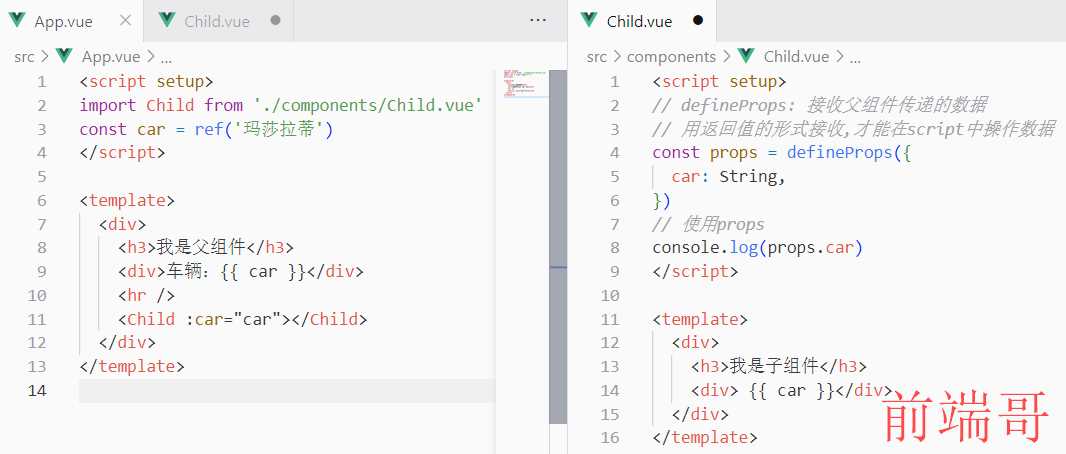
注意:
- 如果只使用
defineProps 接收数据,这个数据只能在模板中渲染 defineProps({ 数据 }) - 如果要在
script 中操作 props 属性,应该接收返回值 const props = defineProps({ 数据 })
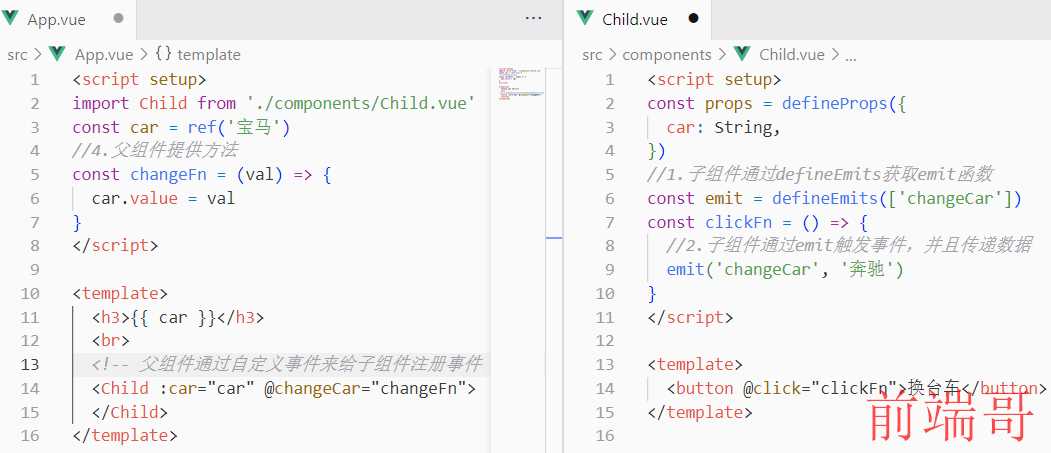
12.子传父-defineEmits函数
- 子组件通过 defineEmits获取 emit 函数(因为没有this)
- 子组件通过 emit 触发事件,并且传递数据
- 父组件提供方法
- 父组件通过自定义事件的方式给子组件注册事件
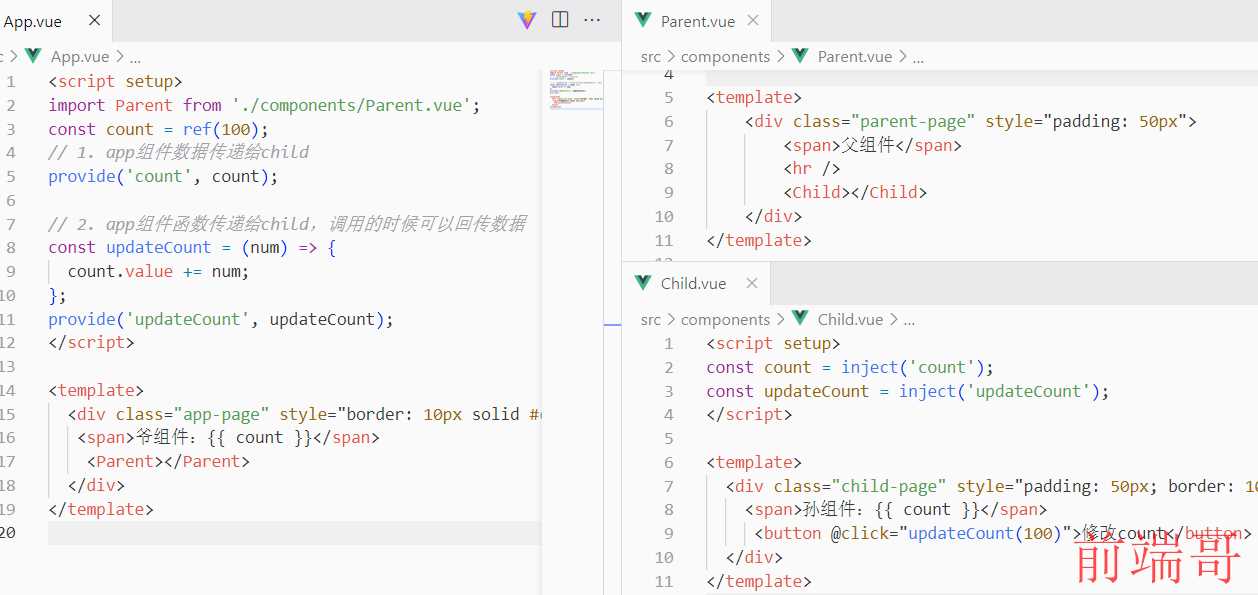
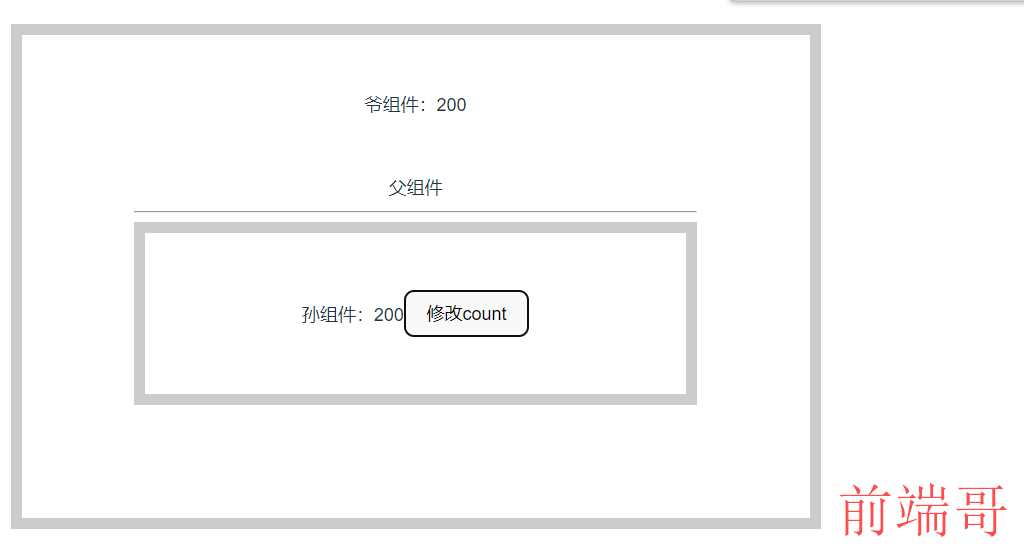
13.跨级组件通讯provide与inject函数
通过provide和inject函数可以简便的实现跨级组件通讯
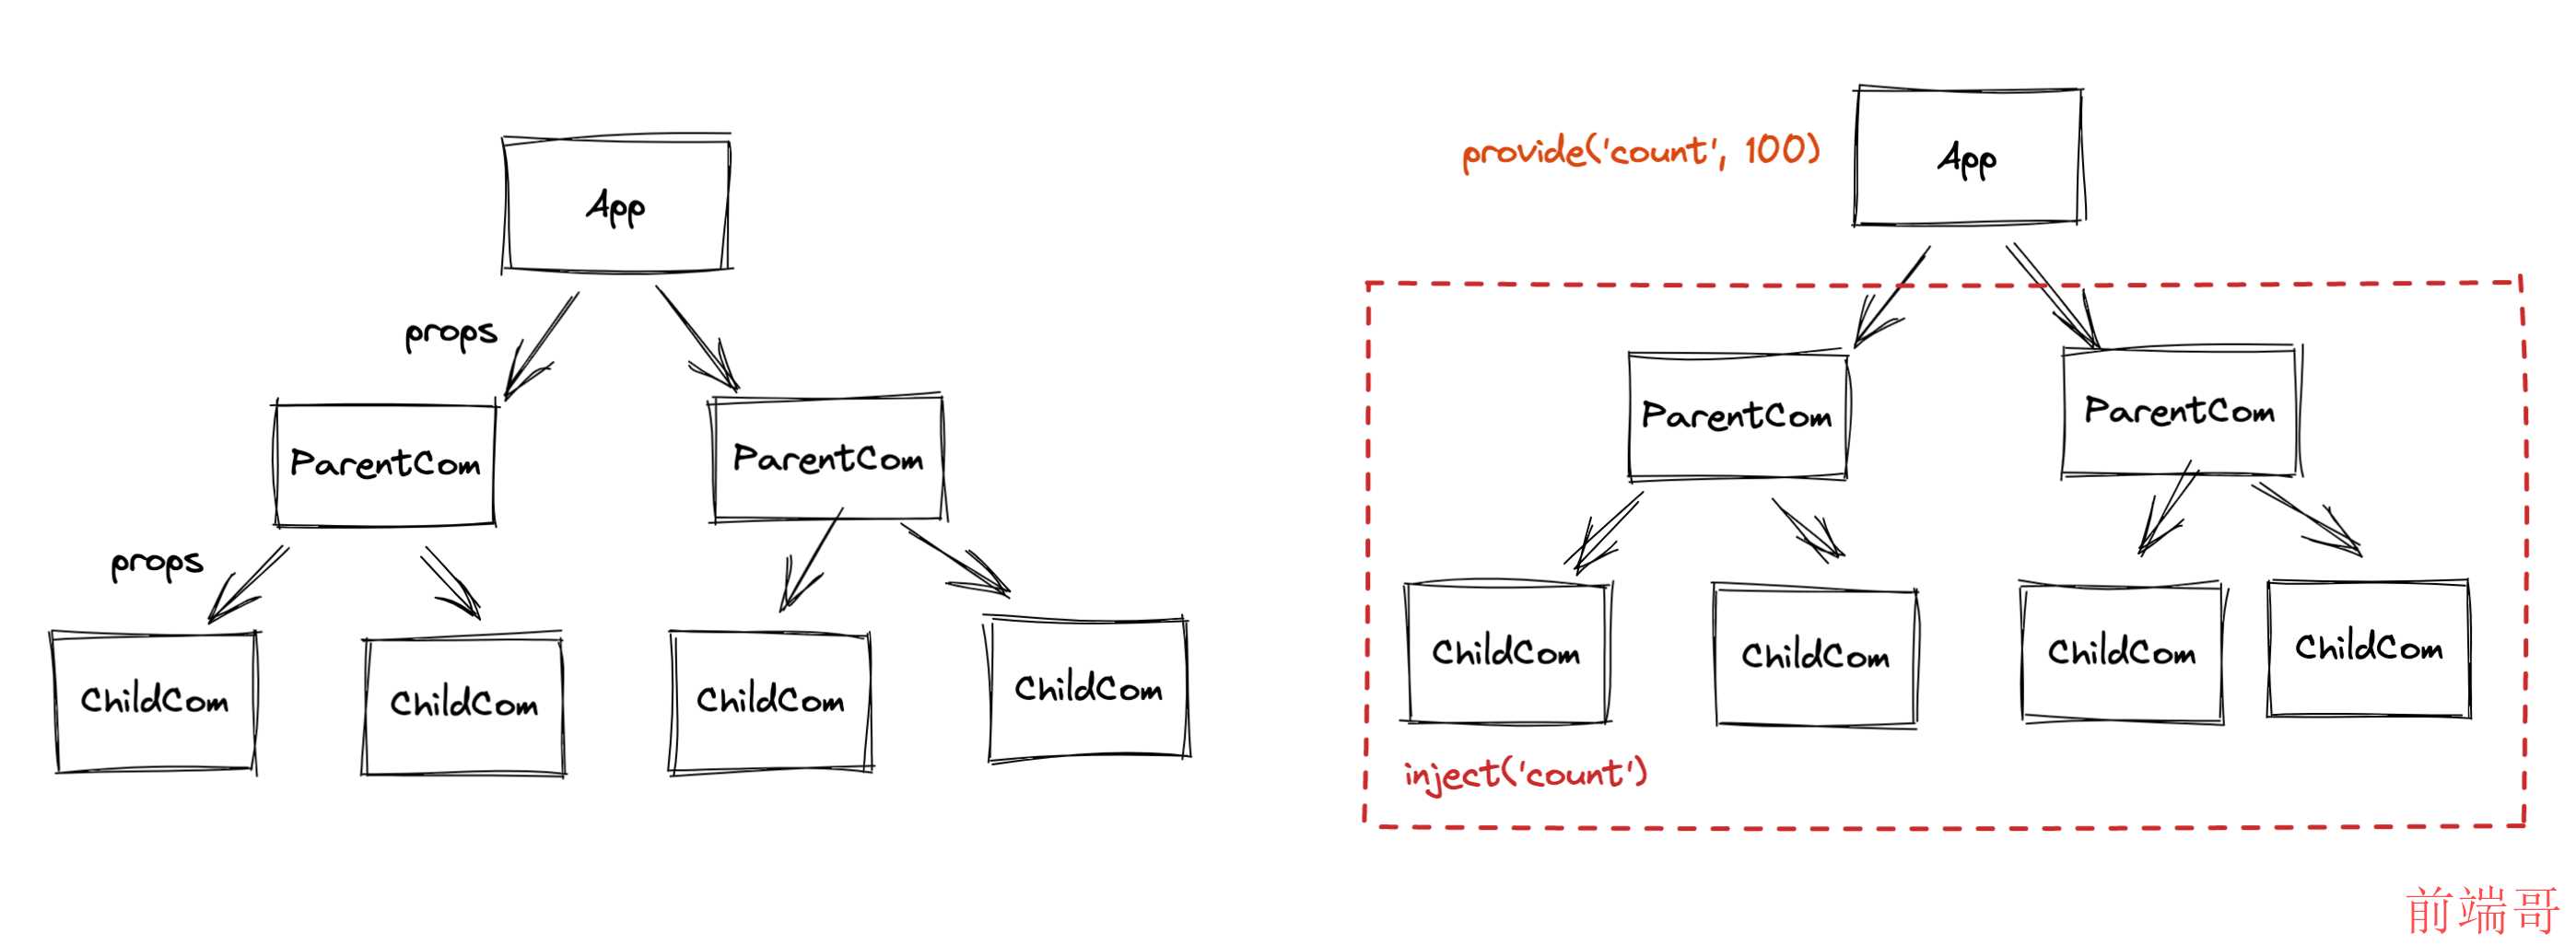
总结:
- provide和inject是解决跨级组件通讯的方案
- provide 提供后代组件需要依赖的数据或函数
- inject 注入(获取)provide提供的数据或函数
官方术语:依赖注入
- App是后代组件依赖的数据和函数的提供者,Child是注入(获取)了App提供的依赖
14.保持响应式-toRefs函数
在使用reactive创建的响应式数据被展开或解构的时候使用toRefs保持响应式
| <script setup> |
| const user = reactive({ name: "tom", age: 18 }); |
| const { name, age } = toRefs(user) |
| </script> |
| |
| <template> |
| <div> |
| <p>姓名:{{ name }}</p> |
| <p>年龄:{{ age }} <button @click="age++">一年又一年</button></p> |
| </div> |
| </template> |
15.综合案例
| <script setup> |
| import { onMounted,ref } from 'vue'; |
| import axios from 'axios' |
| |
| |
| const list = ref([]) |
| |
| const getList = async()=>{ |
| const res = await axios.get('/list') |
| console.log(res); |
| list.value = res.data |
| } |
| onMounted(() => { |
| getList() |
| }) |
| |
| const delClick = async (id) => { |
| await axios.delete("/del?id=" + id) |
| getList() |
| } |
| </script> |
| |
| <template> |
| <div class="app"> |
| <el-table :data="list"> |
| <el-table-column label="ID" prop="id"></el-table-column> |
| <el-table-column label="姓名" width="150" prop="name"></el-table-column> |
| <el-table-column label="籍贯" prop="place"></el-table-column> |
| <el-table-column label="操作" width="100" > |
| <template v-slot="row"> |
| <el-button type="primary" link @click="delClick(row.id)">删除</el-button> |
| </template> |
| </el-table-column> |
| </el-table> |
| </div> |
| </template> |
| <style> |
| .app { |
| width: 980px; |
| margin: 100px auto 0; |
| } |
| </style> |

二、Typescript
1.Typescript起步
1.1 Typescript介绍
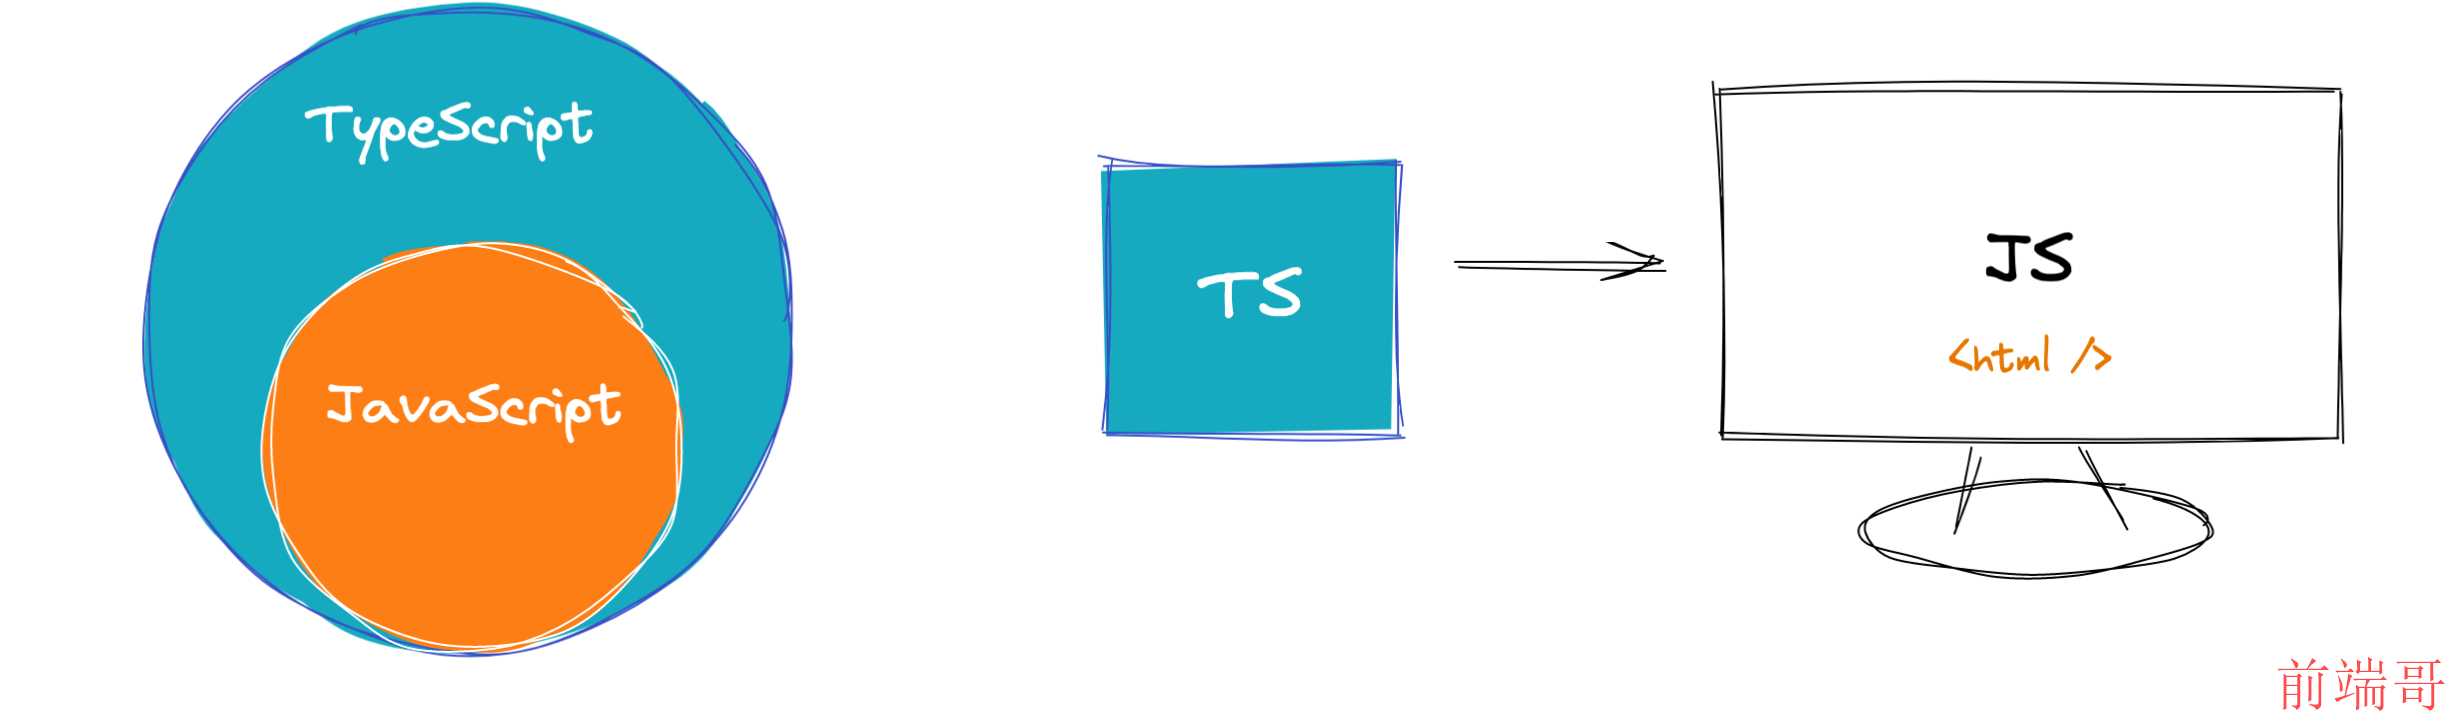
TS 是 JS 的超集,支持了JS 语法和扩展了类型语法。
注意:TS 需要编译才能在浏览器运行。
TS作用:在编译时进行类型检查提示错误
| |
| |
| let age = 18 |
| |
| |
| let age: number = 18 |
- TS 是静态类型的编程语言,代码会先编译再执行,在代码编译期间做类型的相关检查,如果有问题编译是不通过的,也就暴露出了问题。
- 配合 VSCode 等开发工具,TS 可以提前在编写代码的时候发现问题,找出错误。
1.2 TypeScript 编译
使用tsc 编译 ts 代码
| |
| npm i -g typescript |
| |
| yarn global add typescript |
| |
| tsc -v |
2.TypeScript 核心
TS 常用类型:
简单类型:number string boolean null undefined
复杂类型:对象 数组 函数
联合类型、自定义类型(类型别名)、接口、元组、字面量类型、枚举、void、any、泛型 等
2.1 原始类型
| let age: number = 18; |
| let myName: string = '呵呵'; |
| let isLoading: boolean = false; |
| let nullValue: null = null; |
| let undefinedValue: undefined = undefined; |
2.2 数组类型
| let numbers: number[] = [1, 3, 5]; |
| let strings: Array<string> = ['a', 'b', 'c']; |
推荐使用: 类型[] 写法
2.3 联合类型
- 通过联合类型将多个类型合并为一个类型
- 类型与类型之间使用 | 连接,代表类型可以是它们当中的其中一种,这种类型叫联合类型
| let arr: (number | string)[] = [1, 'a', 3, 'b']; |
| |
| let arr: number | string[]; |
| arr=[1,'a'] |
| arr=['a'] |
| arr=1 |
| |
2.4 类型别名
- 语法:
type 类型别名 = 具体类型 - 定义类型别名,遵循大驼峰命名规范,类似于变量
| type CustomArr = (number | string)[]; |
| let arr: CustomArr = [1, 'a', 4]; |
- 使用场景:当同一类型被多次使用时,可以通过类型别名,简化该类型的使用
| type CustomArr = (number | string)[]; |
| let arr: CustomArr = [1, 'a', 4]; |
| let arr2: CustomArr = [2, 'b', 8]; |
2.5 函数类型
2.5.1 基本使用
- 给函数指定类型,其实是给 参数 和 返回值 指定类型。
两种写法:
- 在函数基础上 分别指定 参数和返回值类型
| |
| function add(num1: number, num2: number): number { |
| return num1 + num2; |
| } |
| |
| |
| const add2 = (a:number,b:number):number => a+b |
- 使用类型别名 同时指定 参数和返回值类型(不使用于声明式函数)
| const add3:(a:number,b:number)=>number =(a,b)=>a+b |
| |
| |
| type AddFn = (a: number, b: number) => number; |
| const add3: AddFn = (a, b) => a+b |
2.5.2 void 类型
- 如果函数没有返回值,定义函数类型时返回值类型为
void
| const say = (): void => { |
| console.log('hi'); |
| }; |
- 如果函数没有返回值,且没有定义函数返回值类型的时候,默认是
void
| const say = () => { |
| console.log('hi'); |
| }; |
注意:
- 在
JS 中如果没有返回值,默认返回的是 undefined - 但是
void 和 undefined 在 TypeScript 中并不是一回事 - 如果指定返回值类型是
undefined 那返回值必须是 undefined
| const add = (): undefined => { |
| return undefined; |
| }; |
2.5.3 可选参数
- 如果函数的参数,可以传也可以不传,这种情况就可以使用 可选参数 语法,参数后加
? 即可 - 注意:必选参数不能位于可选参数后
(start?: number, end: number) 这样是不行的
| const fn = (n?: number) => { |
| |
| }; |
| fn(); |
| fn(10); |
2.6 对象类型
- TS 的对象类型,其实就是描述对象中的属性和方法的类型,因为对象是由属性和方法组成的。
- 属性怎么写类型?
属性名: 类型 - 方法怎么写类型?
方法名(): 返回值类型
| |
| let person: {} = {}; |
| |
| |
| let person: { name: string; age: number } = { |
| name: '同学', |
| age: '18' |
| }; |
| |
| |
| |
| let obj: { sayHi(): void } = { |
| sayHi() {}, |
| }; |
2.6.1 拓展用法
| let obj: { sayHi:() => void } = { |
| sayHi() {}, |
| }; |
| const axios = (config: { url: string; method?: string }) => {}; |
| |
| |
| type Config = { |
| url: string; |
| method?: string; |
| }; |
| const axios = (config: Config) => {}; |
2.7 接口 interface
| |
| interface Person { |
| name: string |
| age: number |
| sayHi: () => void; |
| } |
| |
| let person: Person = { |
| name: 'jack', |
| age: 19, |
| sayHi() {}, |
| }; |
2.7.1 interface 继承
- 有两个接口,有相同的属性或者函数,如何提高代码复用?
| interface Point2D { |
| x: number; |
| y: number; |
| } |
| interface Point3D { |
| x: number; |
| y: number; |
| z: number; |
| } |
- 相同的属性或展示可以抽离出来,然后使用
extends 实现继承复用 - 接口继承的语法:
interface 接口A extends 接口B {} - 继承后接口A拥有接口B的所有属性和函数的类型声明
| interface Point2D { |
| x: number; |
| y: number; |
| } |
| |
| interface Point3D extends Point2D { |
| z: number; |
| } |
| |
2.7.2 type 交叉类型
| |
| type Point2D = { |
| x: number; |
| y: number; |
| }; |
| |
| |
| |
| type Point3D = Point2D & { |
| z: number; |
| }; |
2.7.3 interface 和 type 的相同点和区别
- 类型别名和接口非常相似,在许多情况下,可以在它们之间自由选择。
- 不同点:
type 不可重复定义;
| type Person = { |
| name: string; |
| }; |
| |
| type Person = { |
| age: number; |
| }; |
| interface Person { |
| name: string; |
| } |
| interface Person { |
| age: number; |
| } |
| |
| const p: Person = { |
| name: 'jack', |
| age: 18, |
| }; |
2.8 类型推断
在 TS 中存在类型推断机制,在没有指定类型的情况下,TS 也会给变量提供类型。
建议:
1.开发时,能省略类型注解的地方就省略,利用TS推断能力,提高开发效率。
2.在你还没有熟悉 ts 类型的时候建议都加上类型
3.如果不知道类型怎么写,可以把鼠标放至变量上,通过 Vscode 提示看到类型
| |
| const add = (num1: number, num2: number) => { |
| return num1 + num2; |
| }; |
2.9 字面量类型
2.9.1 字面量类型介绍
- 使用 js字面量 作为变量类型,这种类型就是字面量类型
| |
| let name: 'jack' = 'jack'; |
| |
| let age: 18 = 18; |
| |
| |
| age = 19; |
| let str1 = 'Hello TS'; |
| const str2 = 'Hello TS'; |
| |
| |
2.9.2 字面量类型应用
- 字面量类型配合联合类型来使用,表示:一组明确的可选的值
| |
| type Car = 'bc' | 'bm' | 'ad' |
| function pickCar(car: Car) { |
| console.log(car) |
| } |
| |
| |
| pickCar('bc') |
2.10 any 类型
any 类型的作用是逃避 TS 的类型检查any 的使用越多,程序可能出现的漏洞越多,因此不推荐使用 any 类型,尽量避免使用。
| |
| let obj: any = { age: 18 } |
| obj.bar = 100 |
| obj() |
| const n: number = obj |
2.11 类型断言
- 有时候你会比
TS 更加明确一个值的类型,此时,可以使用类型断言来指定更具体的类型 - 使用
as 关键字实现类型断言,as 后面的类型是一个更加具体的类型
| |
| const img = document.getElementById('img') |
| img?.src |
| |
| |
| const img = document.getElementById('img') as HTMLImageElement |
| img?.src |
2.11 泛型
泛型:是指在定义函数、接口或类的时候,不预先指定具体的类型,而在使用的时候再指定类型的一种特性。
- 泛型:定义类型别名后加上
<类型参数> 就是泛型语法, 使用的时候传入具体的类型即可 <T> 是一个变量,可以随意命名,建议遵循大驼峰即可。- 和
类型别名配合,在类型别名后加上泛型语法,然后类型别名内就可以使用这个类型参数 - 泛型可以提高类型的复用性和灵活性
2.11.1 泛型别名
| |
| |
| type UserResponse = { |
| msg:string |
| code:number |
| data:{ |
| name:string |
| age:number |
| } |
| } |
| type GoodsResponse = { |
| msg:string |
| code:number |
| data:{ |
| id:number |
| goodsName:string |
| } |
| } |
| |
| |
| type Data<T> = { |
| msg:string |
| code:number |
| data:T |
| } |
| type UserResponse = Data<{name:string;age:number}> |
| type GoodsResponse = Data<{id:number;goodsName:string}> |
| |
| |
| type Data<T> = { |
| msg:string |
| code:number |
| data:T |
| } |
| type User = { |
| name:string |
| age:number |
| } |
| type UserResponse = Data<User> |
2.11.2 泛型接口
- 泛型在
接口interface上的应用 - 在接口名称的后面添加
<类型变量>,那么,这个接口就变成了泛型接口,接口中所有成员都可以使用类型变量。
| |
| interface IdFnObj<T> { |
| id: () => T; |
| ids: () => T[]; |
| } |
| |
| const obj: IdFnObj<number> = { |
| id() { return 1 }, |
| ids() { return [1, 2] }, |
| }; |
| |
| const obj: IdFnObj<string> = { |
| id() { return '1' }, |
| ids() { return ['1', '2'] }, |
| }; |
| const arr = [1, 2, 3]; |
| |
| arr.push(4); |
| arr.forEach((item) => console.log(item)); |
2.11.3 泛型函数
- 语法:函数名称后加上
<T> , T是类型参数,是个类型变量,命名建议遵循大驼峰即可。 - 好处:让函数可以支持不同类型复用,且保证类型是安全的。
| |
| function getId<T>(id: T): T { |
| return id |
| } |
| |
| let id1 = getId<number>(1) |
| |
| let id2 = getId('2') |
| |
3.TypeScript 应用
3.1TypeScript与Vue
typescript 配合 Vue3 composition-api 使用
3.1.1 defineProps的TS写法
- vue3基础写法
| |
| const props = defineProps({ |
| money: { |
| type: Number, |
| required: true |
| }, |
| car: { |
| type: String, |
| required: false, |
| default: '宝马' |
| } |
| }) |
- vue3和TypeScript的写法
| |
| const props = defineProps<{ |
| money: number |
| car?: string |
| }>() |
- 如果需要给 props 设置默认值,需要使用
withDefaults 函数
| const props = withDefaults(defineProps<{ |
| money: number; |
| car?: string; |
| }>(),{ |
| car: '宝马' |
| }) |
- 上面写法太笨拙,可以使用
响应式语法糖 解构 + defineProps 就行:
| const { money, car = "宝马" } = defineProps<{ |
| money: number |
| car?: string |
| }>(); |
- 注意:目前需要
显式地选择开启 ,因为它还是一个实验性特性。
| |
| export default defineConfig({ |
| plugins: [ |
| vue({ |
| reactivityTransform: true, |
| }), |
| ], |
| }); |
3.1.2 defineEmits的TS写法
defineEmits 的基本用法:
| const emit = defineEmits(['changeMoney', 'changeCar']) |
defineEmits 通过泛型参数来定义,可以实现更细粒度的校验:
| const emit = defineEmits<{ |
| (e: 'changeMoney', money: number): void |
| (e: 'changeCar', car: string): void |
| }>() |
3.1.3 ref的TS写法
- 如果是简单类型,推荐使用类型推导
- 如果是复杂类型,推荐指定泛型
| <template> |
| <div> |
| <ul> |
| <li v-for="item in list" :key="item.id">{{item.name}}</li> |
| </ul> |
| </div> |
| </template> |
| |
| <script setup lang='ts'> |
| import {ref} from 'vue' |
| // 类型别名: type类型别名 = 具体类型 |
| // 数组类型:类型+[]写法 |
| type Todo = { |
| id:number |
| name:string |
| done:boolean |
| }[] |
| const list = ref<Todo>([]) |
| // 模拟从后台获取数据 |
| // 复杂数据一般是后台返回数据,默认值是空,无法进行类型推导。 |
| setTimeout(() => { |
| list.value = [ |
| {id:1,name:'吃饭',done:false}, |
| {id:2,name:'睡觉',done:true}, |
| ] |
| }, 1000) |
3.1.4 reactive的TS写法
- 默认值属性是固定的,推荐使用类型推导
| |
| const book = reactive({ title: 'Vue3' }) |
- 根据默认值推导不出我们需要的类型,推荐使用接口或者类型别名给变量指定类型
官方:不推荐使用reactive()的泛型参数,因为底层和 ref() 实现不一样。
| |
| type Book = { |
| title: string |
| year?: number |
| } |
| const book: Book = reactive({ title: 'Vue3' }) |
| book.year = 2022 |
3.1.5 computed和TS
computed() 会从其计算函数的返回值上推导出类型
| |
| <script setup lang='ts'> |
| import { ref, computed } from 'vue' |
| const count = ref(100); |
| |
| const doubleCount = computed(() => count.value * 2); |
| |
| |
| const doubleMoney = computed<string>(() => (count.value * 2).toFixed(2)); |
| </script> |
- 可以通过泛型参数显式指定类型
| const doubleMoney = computed<string>(() => (count.value * 2).toFixed(2)); |
3.1.6 事件处理与TS
- 不加类型,event默认是any,类型不安全
| <template> |
| <input type="text" @change="handleChange" /> |
| </template> |
| |
| <script setup lang="ts"> |
| |
| const handleChange = (event) => { |
| console.log(event.target.value) |
| } |
| </script> |
- 处理类型
| <template> |
| |
| |
| <input type="text" @change="changeFn" /> |
| </template> |
| |
| <script setup lang="ts"> |
| |
| const changeFn = (event:Event) => { |
| |
| |
| console.log((event.target as HTMLInputElement).value) |
| } |
| </script> |
| |
3.1.7 Template Ref与TS
模板 ref 需要通过一个显式指定的泛型参数,建议默认值 null
| <template> |
| <input ref="input" /> |
| </template> |
| |
| <script setup lang="ts"> |
| import { ref, onMounted } from 'vue' |
| |
| const input = ref<HTMLInputElement| null>(null) |
| onMounted(() => { |
| |
| |
| el.value?.focus() |
| }) |
| </script> |
| |
3.1.8 非空断言
- 可选链
| <template> |
| <div>App组件</div> |
| <input type="text" ref="input" value="abc"> |
| </template> |
| |
| <script setup lang="ts"> |
| import { onMounted, ref } from 'vue'; |
| const input = ref< HTMLInputElement | null >(null) |
| onMounted(()=>{ |
| |
| console.log(input.value?.value); |
| }) |
| </script> |
- 逻辑判断
| if (input.value) { |
| console.log(input.value.value) |
| input.value.value = '123' |
| } |
- 非空断言
| |
| console.log(input.value!.value) |
| input.value!.value = '123' |
3.2 TypeScript类型声明文件
3.2.1 基本介绍
项目中安装的第三方库里面都是打包后的JS代码,但是我们使用的时候却有对应的TS类型提示,这是为什么呢?
因为在第三方库中的JS代码都有对应的 TS类型声明文件
TS 中有两种文件类型:.ts 文件 .d.ts 文件作用是啥?
1 .ts 文件:
- 既包含类型信息又可执行代码
- 可以被编译为
.js 文件,然后,执行代码 - 用途:编写程序代码的地方
2 .d.ts 文件:
3.2.2 内置类型声明文件
- 发现,使用数组时,数组所有方法都会有相应的代码提示以及类型信息
TypeScript 给 JS 运行时可用的所有标准化内置 API 都提供了声明文件,这个声明文件就是 内置类型声明文件
| const strs = ['a', 'b', 'c'] |
| |
| strs.forEach |
- 可以通过 Ctrl + 鼠标左键(Mac:Command + 鼠标左键)来查看内置类型声明文件内容
- 查看 forEach 的类型声明,在 VSCode 中会自动跳转到
lib.es5.d.ts 类型声明文件中 - 像 window、document 等 BOM、DOM API 也都有相应的类型声明文件
lib.dom.d.ts
3.2.3 第三方库类型声明文件
- 常用的第三方库都有相应的类型声明文件,只是使用的方式不同而已。
情况1:库本身自带类型声明文件
- 比如:axios,安装后可查看
node_modules/axios 可发现对应的类型声明文件。 - 导入 axios 后就会加载对应的类型文件,提供该库的类型声明。
情况2:由 DefinitelyTyped 提供
- 比如:jquery,安装后导入,提示:需要安装
@types/jquery 类型声明包 - DefinitelyTyped 是一个 github 仓库,用来提供高质量 TypeScript 类型声明
- 当安装
@types/* 类型声明包后,TS 也会自动加载该类声明包,以提供该库的类型声明 - https://www.typescriptlang.org/dt/search 可以搜索是否有对应的
@types/*
3.2.4 自定义类型声明文件
3.2.4.1 共享类型
- 若多个
.ts 文件中都用到同一个类型,此时可以创建 .d.ts 文件提供该类型,实现类型共享。
操作步骤:
- 创建
index.d.ts 类型声明文件。 - 创建需要共享的类型,并使用
export 导出(TS 中的类型也可以使用 import/export 实现模块化功能)。 - 在需要使用共享类型的
.ts 文件中,通过 import 导入即可(.d.ts 后缀导入时,直接省略)。
| |
| export type Person = { |
| id: number; |
| name: string; |
| age: number; |
| }; |
| |
| <script lang="ts" setup> |
| import { Person } from './types/data' |
| |
| const p: Person = { |
| id: 100, |
| name: 'jack', |
| age: 19 |
| } |
| </script> |
4.TypeScript 案例(头条)
| |
| |
| |
| export type ChannelItem = { |
| id: number; |
| name: string; |
| }; |
| |
| |
| export type ChannelResData = { |
| data: { |
| channels: ChannelItem[]; |
| }; |
| message: string; |
| }; |
| |
| |
| export type ArticleItem = { |
| art_id: string; |
| aut_id: string; |
| aut_name: string; |
| comm_count: number; |
| cover: { |
| cover: number; |
| images: string[]; |
| }; |
| is_top: number; |
| pubdate: string; |
| title: string; |
| }; |
| |
| |
| export type ArticleResData = { |
| data: { |
| pre_timestamp: string; |
| results: ArticleItem[]; |
| }; |
| message: string; |
| }; |
| |
| <template> |
| <ChannelNav :channelId="channelId" @changeChannel="channelId = $event"></ChannelNav> |
| <ArticleList :channelId="channelId"></ArticleList> |
| </template> |
| |
| <script setup lang="ts"> |
| import ChannelNav from './components/ChannelNav.vue'; |
| import ArticleList from './components/ArticleList.vue'; |
| import { ref } from 'vue'; |
| |
| |
| |
| const channelId = ref(1) |
| </script> |
| <template> |
| <div class="channel-nav"> |
| <nav class="list"> |
| <a class="item" :class="{ active: channelId === item.id }" href="javascript:;" |
| v-for="item in getList" :key="item.id" @click="emit('changeChannel', item.id)"> |
| {{ item.name }} |
| </a> |
| </nav> |
| </div> |
| </template> |
| |
| <script setup lang='ts'> |
| import axios from 'axios' |
| import { onMounted, ref } from 'vue'; |
| import { ChannelItem, ChannelResData } from '../types/data'; |
| //父传子 |
| defineProps<{ channelId: number }>() |
| //子传父 |
| const emit = defineEmits<{ |
| (e: 'changeChannel', id: number): void |
| }>() |
| // 获取文章列表 |
| const getList = ref<ChannelItem[]>([]) |
| onMounted(async () => { |
| // 使用TS的时候,axios()调用需要改为 axios.request(),才可以使用泛型 |
| const res = await axios.request<ChannelResData>({ |
| url: 'http://geek.itheima.net/v1_0/channels', |
| method:'GET' |
| }) |
| getList.value = res.data.data.channels |
| }) |
| </script> |
| <template> |
| <div class="article-list"> |
| <div class="article-item" v-for="item in articles" :key="item.art_id"> |
| <p class="title">{{ item.title }}</p> |
| <img v-for="(image, index) in item.cover.images" :key="index" class="img" :src="image" alt="" /> |
| <div class="info"> |
| <span>{{ item.aut_name }}</span> |
| <span>{{ item.comm_count }}评论</span> |
| <span>{{ item.pubdate }}</span> |
| </div> |
| </div> |
| </div> |
| </template> |
| |
| <script setup lang='ts'> |
| import axios from 'axios' |
| import { ref, watch } from 'vue' |
| import { ArticleItem, ArticleResData } from '../types/data' |
| // 父传子 |
| const props = defineProps<{ channelId: number }>() |
| const articles = ref<ArticleItem[]>([]) |
| watch( |
| () => props.channelId, |
| async () => { |
| // 使用TS的时候,axios()调用需要改为 axios.request(),才可以使用泛型 |
| const res = await axios.request<ArticleResData>({ |
| url: 'http://geek.itheima.net/v1_0/articles', |
| params: { |
| channel_id: props.channelId, |
| timestamp: Date.now() |
| } |
| }) |
| articles.value = res.data.data.results |
| }, |
| { immediate: true } |
| ) |
| </script> |
5. TS在vue3中使用总结
| const {money,car='xxx'} = defineProps<{ |
| money:number |
| car?:string |
| }>() |
| const emit = defineEmits<{ |
| {e:'changeChannel',id:number}:void |
| }>() |
| const count = ref(0) |
| const list = ref<TodoItem[]>([]) |
| const book = reactive({title:'xxx'}) |
| |
| |
| const book: {title:string,year?:number} = reactive({title:'xxx'}) |
| const double = computed(()=>count.value*2) |
| const money = computed<string>(()=>(count.value*2).toFixed(2)) |
| |
| |
| |
| |
| |
| const handleChange = (event:Event) => { |
| (event.target as HTMLInputElement).value |
| } |
| const dom = ref<HTMLInputElement | null>(null) |
| |
| onMounted(() => { |
| |
| |
| dom.value!.value |
| }) |
| |
| <input ref="dom"> |
三、Pinia
3.1 Pinia介绍
Pinia中文文档
Pinia 是一个状态管理工具,它和 Vuex 一样为 Vue 应用程序提供共享状态管理能力。- 语法和
Vue3 一样,它实现状态管理有两种语法:选项式API 与 组合式API,我们学习组合式API语法。 - 它也支持
Vue2 也支持 devtools,当然它也是类型安全的,支持 TypeScript
Pinia的数据流转图
- 可以创建多个全局仓库,不用像
Vuex 一个仓库嵌套模块,结构复杂。 - 管理数据简单,提供数据和修改数据的逻辑即可,不像
Vuex需要记忆太多的API。

3.2 Pinia使用步骤(以vue3为例)
总结:通过 const useXxxStore = defineStore('id',函数) 创建仓库得到使用仓库的函数

- 安装
pinia
| yarn add pinia |
| # 或者使用 npm |
| npm install pinia |
main.ts中引入注册
| |
| import { createApp } from 'vue' |
| import App from './App.vue' |
| import { createPinia } from 'pinia' |
| |
| |
| const pinia = createPinia() |
| const app = createApp(App); |
| |
| app.use(pinia) |
| app.mount('#app') |
- 在
src/store下新建一个counter.ts文件
| |
| import { defineStore } from 'pinia' |
| import { computed, ref } from 'vue' |
| |
| |
| |
| |
| export const useCounterStore = defineStore('counter', () => { |
| |
| const count = ref(100) |
| |
| const doubleCount = computed(() => count.value * 2) |
| |
| const update = () => count.value++ |
| |
| const asyncUpdate = () => { |
| setTimeout(() => { |
| count.value += 1000 |
| }, 1000); |
| } |
| return { count, doubleCount, update, asyncUpdate } |
| }) |
- 在App.vue中使用
| <template> |
| <div> |
| <p>APP组件{{ store.count }} {{ store.doubleCount }}</p> |
| <button @click="store.update()">改Count</button> |
| <button @click="store.asyncUpdate()">异步改Count</button> |
| </div> |
| </template> |
| |
| <script setup lang='ts'> |
| import { useCounterStore } from './store/counter'; |
| |
| const store = useCounterStore() |
| </script> |
3.3 storeToRefs的使用
- 问题:当我们想解构
store 提供的数据时候,发现数据是没有响应式的。 - 解决:使用
storeToRefs 解决解构仓库状态丢失响应式的问题
| import { storeToRefs } from 'pinia' |
| |
| const store = useCounterStore() |
| const { count, doubleCount } = storeToRefs(store) |
3.4 用Pinia改造头条

| import { createApp } from 'vue' |
| import './styles/index.css' |
| |
| import { createPinia } from 'pinia' |
| import App from './App.vue' |
| |
| |
| const pinia = createPinia() |
| const app = createApp(App); |
| |
| |
| app.use(pinia) |
| app.mount('#app') |
| |
| |
| |
| export type ChannelItem = { |
| id: number; |
| name: string; |
| }; |
| |
| |
| export type ChannelResData = { |
| data: { |
| channels: ChannelItem[]; |
| }; |
| message: string; |
| }; |
| |
| |
| export type ArticleItem = { |
| art_id: string; |
| aut_id: string; |
| aut_name: string; |
| comm_count: number; |
| cover: { |
| cover: number; |
| images: string[]; |
| }; |
| is_top: number; |
| pubdate: string; |
| title: string; |
| }; |
| |
| |
| export type ArticleResData = { |
| data: { |
| pre_timestamp: string; |
| results: ArticleItem[]; |
| }; |
| message: string; |
| }; |
| |
| import {defineStore} from 'pinia' |
| import {ref} from 'vue' |
| |
| export const useChannelStore = defineStore('channel',()=>{ |
| |
| const channelId = ref(0) |
| |
| const changeChannel = (id:number) => { |
| channelId.value = id |
| } |
| return {channelId,changeChannel} |
| }) |
| <template> |
| <!-- 频道导航组件 --> |
| <ChannelNav></ChannelNav> |
| <!-- 文章列表组件 --> |
| <ArticleList></ArticleList> |
| </template> |
| |
| <script setup lang="ts"> |
| |
| import ChannelNav from './components/ChannelNav.vue'; |
| import ArticleList from './components/ArticleList.vue'; |
| </script> |
| <!-- 频道导航组件 --> |
| <template> |
| <div class="channel-nav"> |
| <nav class="list"> |
| <a class="item" :class="{ active: store.channelId === item.id }" href="javascript:;" |
| v-for="item in getList" :key="item.id" @click="store.changeChannel(item.id)"> |
| {{ item.name }} |
| </a> |
| </nav> |
| </div> |
| </template> |
| |
| <script setup lang='ts'> |
| import axios from 'axios' |
| import { onMounted, ref } from 'vue'; |
| import { useChannelStore } from '../store/channel'; |
| import { ChannelItem, ChannelResData } from '../types/data'; |
| |
| // 定义文章列表数组 |
| const getList = ref<ChannelItem[]>([]) |
| onMounted(async () => { |
| // 使用TS的时候,axios()调用需要改为 axios.request(),才可以使用泛型 |
| const res = await axios.request<ChannelResData>({ |
| url: 'http://geek.itheima.net/v1_0/channels', |
| method:'GET' |
| }) |
| getList.value = res.data.data.channels |
| }) |
| |
| // 使用名为 useChannelStore的仓库 |
| const store = useChannelStore() |
| </script> |
| <!-- 文章列表组件 --> |
| <template> |
| <div class="article-list"> |
| <div class="article-item" v-for="item in articles" :key="item.art_id"> |
| <p class="title">{{ item.title }}</p> |
| <img v-for="(image, index) in item.cover.images" :key="index" class="img" :src="image" alt="" /> |
| <div class="info"> |
| <span>{{ item.aut_name }}</span> |
| <span>{{ item.comm_count }}评论</span> |
| <span>{{ item.pubdate }}</span> |
| </div> |
| </div> |
| </div> |
| </template> |
| |
| <script setup lang='ts'> |
| import axios from 'axios' |
| import { ref, watch } from 'vue' |
| import { useChannelStore } from '../store/channel'; |
| import { ArticleItem, ArticleResData } from '../types/data' |
| |
| // 使用名为 useChannelStore的仓库 |
| const store = useChannelStore() |
| |
| const articles = ref<ArticleItem[]>([]) |
| watch( |
| () => store.channelId, |
| async () => { |
| // 使用TS的时候,axios()调用需要改为 axios.request(),才可以使用泛型 |
| const res = await axios.request<ArticleResData>({ |
| url: 'http://geek.itheima.net/v1_0/articles', |
| method: 'GET', |
| params: { |
| channel_id: store.channelId, |
| timestamp: Date.now() |
| } |
| }) |
| articles.value = res.data.data.results |
| console.log(res.data.data); |
| }, |
| { immediate: true } |
| ) |
| </script> |


